
Uniquely Etched Light Bulbs in 6 Easy Steps
All good super hero stories have a sequel. Right?! Well, a few weeks ago I took on one of creative bucket list items – wiring a lamp from scratch. Here’s the STORY. This week I made my second grain scoop industrial lamp (MUCH faster the second time) and I couldn’t help but think it was missing something.

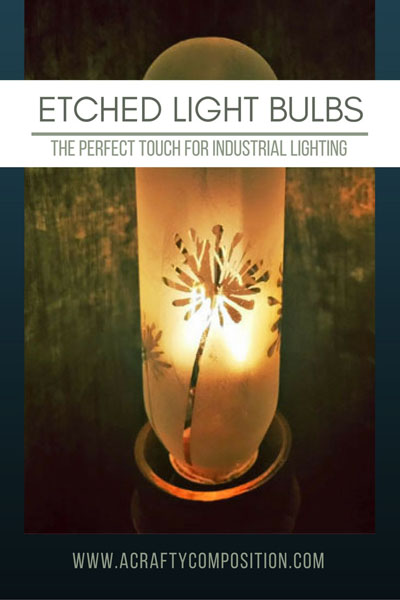
I loved the mix of galvanized steel and copper but the light bulb was a little harsh (even using only 15 watts). Then I thought, how cool it would be to put a pattern on the exposed light bulb! I put on my creative super socks (why not?) and figured out how to glass etch a light bulb. Let me tell you, it is so stinkin’ easy; like 10 minutes and KaPow! Really cool light bulbs.

I love love love how etching the glass softens the light. Your can still see bits of the cool filament inside the bulb but it is not so glared.
Here’s what you need and how to do it… so easy!!
SUPPLY LIST
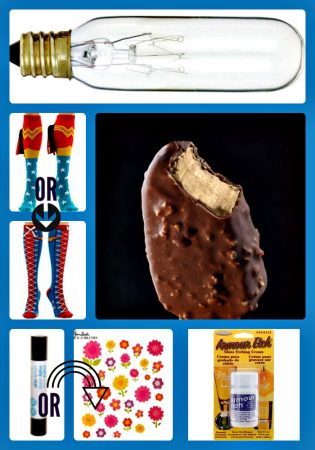
A clear light bulb (15 Watt Candelabra Bulb)
Creative super socks With Cape OR Lace Ups
Haagan Dazs ice cream bar (YES, you need this!)
Craft vinyl like Silhouette OR Cricut OR shaped stickers like these OR Frog Tape
Glass etching cream (Armour Etch Cream)
Scissors and tweezers are helpful
Glass cleaner and paper towels
INSTRUCTIONS
STEP ONE: Put your creative super socks on – I dare you not to feel creatively empowered with them on. Now, wash & dry your light bulb with glass cleaner.
STEP TWO: Use your Silhouette or Cricut Die Cut Machine to cut out your vinyl shapes (flowers, leaves, swirls…), OR draw your design on the vinyl with a fine tip Sharpie and hand cut it, OR cut thin strips of Frog Tape, OR select your shaped stickers (again, flowers, leaves, letters, numbers…). IF your are using stickers, make sure the actual cut out part is detailed enough. To test, peel the sticker up and flip it over so you aren’t looking at the artwork. If it looks like a blob and not a flower, tree or whatever, it’s not detailed enough.
STEP THREE: Eat your ice cream bar. Really. Eat it. You need the Popsicle stick from it. Sure you could use a paint brush or another kind of stick but how often do you have a completely justified reason for eating an ice cream bar while wearing creative super power socks!? JUST DO IT!
STEP FOUR: Put your stickers or vinyl shapes onto your light bulb. Rub them down gently with your cleaned Popsicle stick, concentrating on the edges.
STEP FIVE: Use your Popsicle stick (see what a crucial tool it is) to spread an even layer of Armour Etch over the entire glass section of your light bulb.
STEP SIX: Wait 60 seconds and rinse off the cream with warm water. Be careful to hold the screw-in part of your light bulb up so that the water runs away from it, not towards it. Pull your vinyl or stickers off. Give the bulb a final rinse and wipe any left over bits of the cream off with a damp paper towel. Make sure there is no etching cream on the plug-in part of the light bulb and that it is thoroughly dry before you plug it in.
Now, just screw it in and turn it on!


I seriously can’t believe how easy this is! I was worried that the etching might compromise the glass but I had one of them on for about 4 or 5 hours the other night and there was no problem.
I think I need to make some bigger light bulbs next – after all, there are three ice cream bars to a box, just sayin’. Have fun!
Related Posts

5-Minute Mini Gift Bag
If you have followed A Crafty Composition for a while you know it is fairly…
January 2611 COMMENTS
COMMENTS (I love hearing from you!)


Dianne Perkins | 8th Oct 21
Are you still having no problems with the etched light bulbs? I came up with this idea myself, but googled to see if anyone else had tried it. I read several threads that questioned the integrity of the glass if it was etched. That made me back off the idea and pass up buying the etching cream at HL. Then, I came across your blog and you’d actually done the experiment. Can you update me on experience. Thanks so much, Dianne
JoElle | 23rd Mar 22
Sorry for the delayed response on the etched light bulbs. I’ve not been very active on the blog this past year but I do try to check it every once in a while. I haven’t had any problems with the light bulbs that I etched. Please keep in mind that I only did small, low wattage ones. I’m not sure how a larger and higher wattage would do. I hope this helps somewhat. Sorry again for the delay.
Dianne Perkins | 8th Oct 21
JoElle:
Still having no problems (e.g. exploding!) with your etched bulbs. I came up with this idea myself and decided to google it to see if anyone else attempted this. I read several threads where the integrity of the glass might be damaged by the etching cream, so I was a little hesitant and backed off the idea. Then, I found your blog. Hope you can update this after so long. Thanks so much, Dianne
Betsy | 19th Jan 21
I want to do this to a 40 watt bulb. Do you have any experience with that? Thanks, Betsy
JoElle | 20th Jan 21
Hello there – thanks for your question. I have not done larger wattage bulbs myself but the process would be exactly the same. Sounds cool – shoot me a picture when you are done (www.acraftycompostion.com)
Tania | 4th Oct 17
Shut up!!! What a great idea!!
Tania
JoElle | 10th Oct 17
LOL! Thank you Tania!
Vikki | 4th Oct 17
I’ve never seen this anywhere, but what a great idea!!! Hmmm…..must be the socks. Keep those great ideas coming!
JoElle | 10th Oct 17
Thank you Vikki. Etching the light bulb really helped to soften the glare. (Gotta love them socks!)
Maria | 4th Oct 17
What a Cool Idea!!!
I etched some wine bottle many years ago to make detergent decanters that were pretty enough to leave on the counter, but the light bulb idea is so very Cool!
Love it! Now to fine what else can be etched 🙂
JoElle | 10th Oct 17
Thanks Maria! In the past, I’ve etched a mirror, ornaments and glass plates. All worked really well. I like your wine bottles idea – very fun.