
DIY Industrial Coffee Table…YES YOU CAN!

Hello Lovelies! Last week I promised to share where I put the succulent trough that I made with my leftover terrarium goodies so … voila! We made not one but two DIY industrial tables (because they are so darn cool!). Building my own patio tables was not my original plan; not really even on my radar. It came about out of frustration over finding an outdoor coffee table that met all our needs. ONE: it had to be heavy because we get some wicked windy storms here. When I was a kid we just called them dust storms but now, for some silly reason, they call them haboobs; like the sound of laughter, “ha” followed by the word “boob”. Yes…really. Anyway, I really don’t want to retrieve my patio furniture from the cactus-filled desert behind us so the table had to be heavy. TWO: It had to go from wet to hot and dry without disintegrating. That pretty much nixed plastic (resin) and wood. THREE: it had to be easy to clean. Arizona is a very dusty place so I wanted a surface that didn’t show the dust (so no glass) and I wanted to be able to wipe it down with a wet cloth when a margarita spilled (tragic!). FINALLY: it had to coordinated with our outdoor look where we have several industrial metal trellises. Nothing store-bought ticked all my boxes and the tables that met most of my needs, were NOT budget friendly. So, I did what every desperate crafter does…I scoured Pinterest and uttered the words, “Oh I can make that!”
Here is how we made our industrial coffee table and some of the resources we found useful – but first, a warning! These tables are addicting and fun to make. You may want to put your reality check buddy on notice should you need to be talked out of ordering steel pipe by the freight load.
LET’S GET INSPIRED
There is no shortage of ideas out there for industrial/pipe furniture and lighting. Just browse through Pinterest and Etsy and you will see the basics as well as some fantastically creative ideas. There are also several DIY blogs out there offering tutorials for ‘pipe tables’ or ‘DIY industrial tables’. Here are a few I found really helpful/inspirational.


Well, by now you probably have visions of galvanized steel pipe dancing in your head so let’s get down to the nitty gritty of how these things go together.
PIPE 101
TYPES: For the purpose of making furniture, there are 4 different types of pipe you could use; copper, brass, galvanized steel and black iron. Galvanized steel is the most popular material for industrial pipe furniture because it is relatively inexpensive, strong and has many size and fitting options. For this reason, everything in this tutorial is geared towards galvanized steel pipe.
DIAMETER SIZE: Galvanized pipe comes in different diameters. Our coffee table wasn’t very big so we used 1/2″ diameter. A dining table would need a larger diameter pipe, not only for stability but for aesthetics. The first thing you want to do is determine what diameter size you are going to use. Whatever size you decide, make sure all your fittings are of that same diameter size.
FITTINGS, FLANGES & NIPPLES (oh my): Technically, all the parts that are used to connect a piece of pipe to another piece of pipe or to another surface are called FITTINGS. Within the fittings category, there are nipples, flanges and connectors. Now, let’s set the record straight. Yes, the straight connector pieces of pipe are really called nipples – I have no idea why. I’m afraid to Google it. I tell you this so if you are ordering on-line or looking for them in the hardware store, you will know the official(ly stupid) name. I will call them ‘short pipes’ because the maximum length they come in is 12″ and they are pipes. There. Simple. Short pipes are available in 1″ increments (some places carry 1/2″ increments). This gives you lots of flexibility for the sizing of your project. Flanges are the saucer looking pieces that help you connect the end of a pipe to a flat surface; like to the underside of a table top. Connectors are all the different pieces that connect one piece of short pipe to another. There are Tees (looks like a ‘T’), Wyes (looks like a ‘V’), Elbows and Couplings. Don’t forget to make sure all your fittings are the same diameter.
ANATOMY OF AN INDUSTRIAL COFFEE TABLE
MATERIALS:
What type of pipe? At the time, black pipe was less expensive than galvanized steel pipe so we used that for our table. Here’s our first piece of time saving advice…don’t use black pipe. Although we saved about $20 on the total price of our table by using black pipe, we spent 2 hours sanding the pipe with steel wool to get the messy black coating off. Hindsight, I would pay the extra 20 bucks and save myself the trouble. Also, piping prices fluctuate so sometimes, black pipe is actually the same price or even more expensive than galvanized steel. Lesson learned.
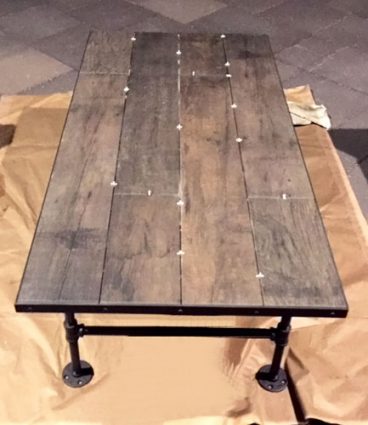
What is your table top made of? We knew we wanted a wood look for the top of the table but, to meet our needs of weather-resistant durability and ease of cleaning, we went with a wood looking porcelain tile (this tile was also FREE because it was leftover from my craft room floor. Free is always good). We needed a base for the tile to be placed on so we used a pine plywood board which came pre-cut in a 2′ x 4′ piece. BINGO! This size worked perfectly with our 6″ wide tile planks and fit nicely in the space on our patio.
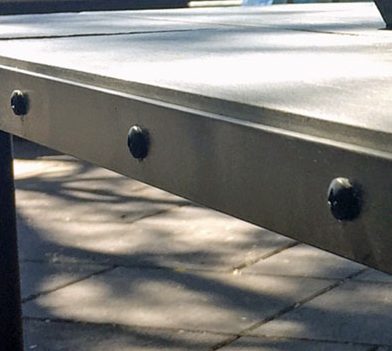
Decorative and/or Functional accents? We needed to hide the plywood base of the table top so we decided to go with a metal band around the side of the coffee table. To accentuate the industrial look we decided to attach the metal band to the plywood with pan-head screws. Our table was small enough to be easily moved without wheels. If you decide to put wheels on your table – check out the 4men1lady’s dining table post link above for special instructions on installing wheels to your pipe.
DIMENSIONS:
Now that you know your materials you can determine the dimensions of your table. You probably already have a general idea of the best size for the space you have but you also need to consider your ability to cut down your various materials. Do you have the tools necessary to cut plywood? How about the tile or the metal banding? This is where a project can turn expensive so try to limit the amount of material sizing required. Remember, the short pipe comes in increments of 1″ (sometimes even 1/2″) so it is easy to adapt the base of the table to fit the top. If some material sizing is necessary, your big-box hardware stores will often do the cutting for you if you purchase the material from them.
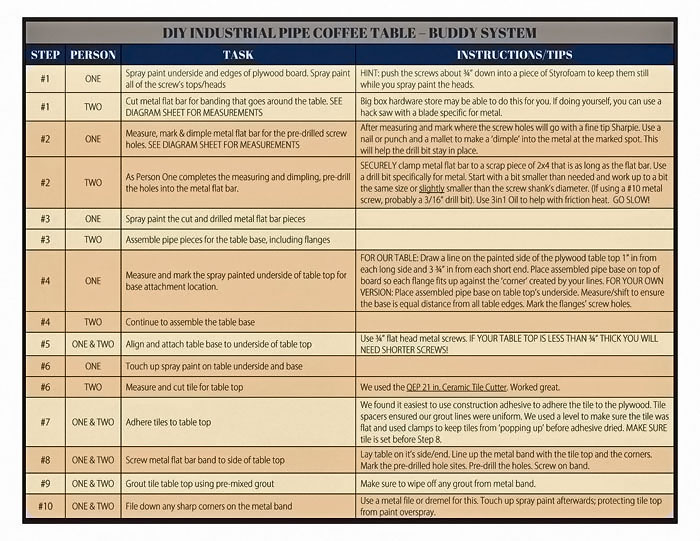
Knowing your table top dimensions, you can now work your way down to the pipe configurations. Some people have an incredible ability to envision things in a mechanical way and do math in their heads. This is profoundly NOT one of my abilities. If you are on the team of visual thinkers, you have two choices; 1) Make friends with or marry one of these amazing people and bring them to the store with you or 2) Get out a piece of paper and draw out your table. If you want to make OUR industrial coffee table, you are in luck. The diagram below gives you all the measurements plus a list of necessary supplies and tools.

WHAT?! You can’t read the itty bitty numbers and letters on the diagram? No worries. Click HERE for an 8.5 x 11 Printable PDF. WooHoo!
CONSTRUCTION:
To Clean or Not To Clean…that is the question. I’ve read mixed advice on whether you need to clean galvanized steel pipe if you are going to paint it. Now, black pipe is an entirely different issue. As previously discussed, you will absolutely have to put some elbow grease into cleaning black pipe. Galvanized steel pipe; however, is pretty residue free. There can be price sticker goop or waxes that are hard to see yet may effect how your spray paint adheres. My advice, go ahead and run some fine steel wool over your pipe and/or wipe the pipes down with Sudsy Ammonia or make your own DIY Soapy Ammonia. Make sure you thoroughly dry the pipes before painting them. Once you have addressed your pipe cleaning dilemma, you are ready to start building your table. Here are a few pics of our process.
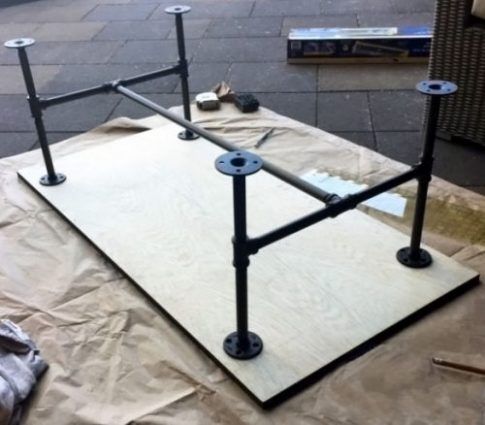
While one person can accomplish this project on their own, it is much easier with two people (and more fun). After the first table, we figured out a pretty good system… and guess what? We’ve got a PDF for that too! BINGO! There’s absolutely no reason you can’t build your own industrial coffee table now. You are inspired. You are educated and you are informed. YES! YOU CAN DO IT… just have that reality-check buddy ready to talk you down from the forklift at Home Depot.
Well ladies, this has been a long one but I really wanted you to see how many different options there are for some creative and durable industrial furniture. Now, you have some inspiration and resources so give it a try. My next industrial table will be a small outdoor one to go between our two chaise lounges. After that, I really want to try a light fixture. Eeeek…electricity!
I don’t know about you but I think it’s time for some nosh (served on the coffee table of course) and a nap. Have a wonderful weekend!
Cheers!
Related Posts

Fun & Functional DIY Lighting
I have a dilemma. A significant crafter’s dilemma that I’m sure…
November 18
6 COMMENTS
COMMENTS (I love hearing from you!)


Karen R. | 18th Aug 17
I’m in!! And I need some new furniture for our new patio, when can you come???? It would be so fun to do together….wink, wink, LOL ‘-)
JoElle | 19th Aug 17
Thanks for subscribing Karen. I wish I could zip right over and help you make a bunch of tables. We would have so much fun. I do have a fee for my services though – guacamole, salsa and a margarita. Of course, we should hold off on the margarita until AFTER the tables are made.
Vikki | 11th Aug 17
Tania–I always love your comments!! And, JoElle, your table looks so professional and that is a great tutorial. (…and I’ll be right over for that yummy snack!)
JoElle | 13th Aug 17
Thanks Vikki!
nom nom nom
Tania | 11th Aug 17
Wow, that table looks great JoElle! So… it looks like you needed quite a few nipples to create a table for the big haboobs!!! Bwahahaha! Sorry… I couldn’t resist! Really though, I love how the table turned out and it should last for years!!
Tania
JoElle | 13th Aug 17
Exactly!! So funny Tania.