
Three Easy Steps To Creating Gorgeous Art Rocks
Okay… have y’all been painting rocks? I have. Actually, rocks have taken over my craft room. I have about 2 or 3 dozen finished and I hid 6 of them (in plain site) all over town while running errands yesterday. A little rock here…a little rock there. I had so much fun imagining the smiles the rocks would bring to whomever found them; like a little spritz of happy in their day. Today, I’m very excited to share a different way to paint rocks. A method that requires NO drawing ability and only three steps to create drop dead gorgeous art rocks. I promise you, if you weren’t addicted before…you will be now.
Many people assume that because I craft, I’m an artist. True, I am creative and I do make things BUT I CAN NOT DRAW. Seriously! Drawing the figure for hangman is the extent of my drawing abilities. Consequently, I absolutely love this method of rock painting. By applying acrylic paint with a pouring method, people like me can create something truly artistic and randomly beautiful. Each rock is completely unique and SO COOL! Let’s get started.
Altering Acrylic Paint for Pouring
First of all, let me say there is a BIG difference between my casual methods of paint pouring and the pouring methods of artists creating works on canvas. There so much more research and testing done by these artists; I am just painting rocks and I want to do this as inexpensively and carefreely as possible. Therefore, I have scraped bits and pieces of info to create a paint that works for my hobbyist purpose. If you are interested in acrylic pouring on canvas as an art form, please do your research and check out the many fabulous professional artists out there – like my personal fav mixed media artist, Emma Lindstrom.
So, let’s take a look at how to alter acrylic paint so that it pours well. You’re probably thinking, why not just add water to your paint until it is thin enough to pour? Well, water alters paint in many ways. Primarily, it dilutes the pigments so they are not as intense or as opaque (solid). It also alters the texture and how the paint dries. You want your paint to flow but you also want it to retain it’s color, shine and smoothness when dry. After trying several options, I found that a combination of acrylic paint, Floetrol, Golden GAC 800 and Silicone (treadmill lubricant) worked the best. Here’s the scoop on each
ACRYLIC PAINT
What: Semi-gloss or gloss acrylic paint. Can be craft paint such as Plaid Apple Barrel or Americana OR basic fine art acrylic paint like Amsterdam Standard Series, Liquitex Basic or Master’s Touch (Hobby Lobby)
Where: Local art or craft store or Amazon on-line.
Cost: $1.30 for small craft paints or $4-$6 for basic fine art acrylic (usually 2-4 oz)
Formula Quantity: 1 ounce
FLOETROL
What: “Flood” (brand) Floetrol is a paint additive that makes paint flow more easily and level out smoothly without diluting the pigmentation of the paint.
Where: Local hardware store or order HERE from Amazon.
HERE is a combo set with Floetrol, 8oz cups, and stir sticks
Cost: $7.00 for 1 Quart
Formula Quantity: .33 to .44 ounces (10-12ml) per 1 ounce of paint
GOLDEN GAC 800
What: An acrylic medium (paint additive) for pouring colors with reduced ‘crazing’ (basically helps your poured paint dry level)
Where: Local art supply store or HERE from Amazon.
Cost: $14 for 8 ounces
Formula Quantity: .33 to .50 ounces (10-15ml) per 1 ounce of paint
SILICONE (TREADMILL LUBRICANT)
What: This is what creates the ‘cells’. Don’t skip this – the cells are so cool looking!
Where: I ordered from AMAZON. Buy the 4 ounce HERE
Cost: around $12 for 4 oz
Formula Quantity: 1-3 drops per 1 ounce of paint. You want some colors to have more than others
There are two additional items you may want to purchase if you think making these art rocks is going to be your new favorite hobby
8 oz Squeeze Bottles with Lids – HERE
4 oz. Squeeze Bottles with Lids – HERE
(As long as the lids are on tight – they store well for a week or so)
2 oz Pouring Cups 50 count – HERE
2 oz Pouring Cups 150 count – HERE
I like the 2 oz so you have room for stirring. You can wash these out and get several pours out of each one. They have measurement marks too which helps you measure out the Floetrol and GAC 800. If you don’t want something disposable, a shot glass works well.
Additional Items: paper towels, aluminum foil, rubber gloves, stir sticks, a propane candle lighter and an inexpensive cookie tray and wire cooling rack (Dollar Store!)
Please remember, ordering your supplies from the affiliate links I provide makes it possible for me to continue producing the Crafty Composition Blog. You pay the same price and get the same perks (Prime) as you would if you went directly to your Amazon account. So, IF you are going to purchase these items, I greatly appreciate your support by using the links provided. Thank You!
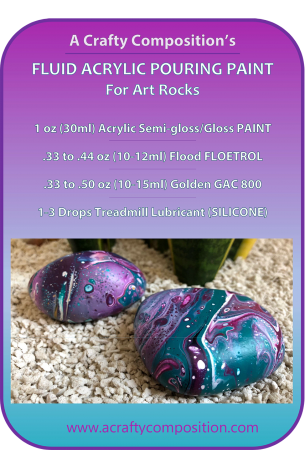
Oops – Almost forgot…here’s a quick recipe card for my paint formula.
(you can also pin this from my Pinterest “Crafty Comp Rocks!” Board)
OKAY – I know at this point you are thinking…
Hey! I thought JoElle said this was 3 easy steps to gorgeous art rocks?!
It is. It is…once you have your paint mixed up.
ONWARD
Three Easy Steps to Art Rocks that ROCK!
Step ONE
Place your washed rock on top of your cheap cooling rack which is sitting on top of your cheap cookie sheet, lined with foil. Place your mini measure cup/shot glass next to it. Pick 3 coordinating paint colors plus white (pre-mixed using the formula above). Layer the paint into your mini cup until it’s about half full. Any random order of colors is fine but I often start with white.


Step TWO
There are two ways to do step two and I use both techniques. Of the two, I would say Technique B gives you the most control over your design. Technique A is completely random. . . Surprise!
Technique A:
You can place the TOP of your rock, facing down, over your mini measure cup and flip it so the cup is now upside-down on top of the rock. I REALLY like the little medicine cups for this technique because they are flexible enough to form to the curves of the rock. I can usually get a pretty good seal between the cup and the rock before I flip it. Pull the cup up, letting the paint flow over the rock. Tilt, tap, or shake the rock to help the paint flow in the direction you want. Try to get as much of the top of the rock covered as possible using these actions. Place rock down on cooling rack. With a small paint brush or craft stick, scoop up pooled paint from the cookie sheet and drip or drag onto uncovered areas or areas your fingers were holding. DON’T DO TO MUCH OF THIS as this paint tends to be more blended and you will lose the unique ‘pouring’ effect.
Technique B:
Holding your rock in one hand and your mini cup in the other, start pouring the paint over your rock, moving from one end towards the other. Tilt, tap, or shake the rock to help the paint flow in the direction you want. Try to get as much of the top of the rock covered as possible using these actions. Place rock down on cooling rack. With a small paint brush or craft stick, scoop up pooled paint from the cookie sheet and drip or drag onto uncovered areas or areas your fingers were holding. DON’T DO TO MUCH OF THIS as this paint tends to be more blended and you will lose the unique ‘pouring’ effect.


Step THREE (Optional)
You will need a little propane torch or candle lighter for this step
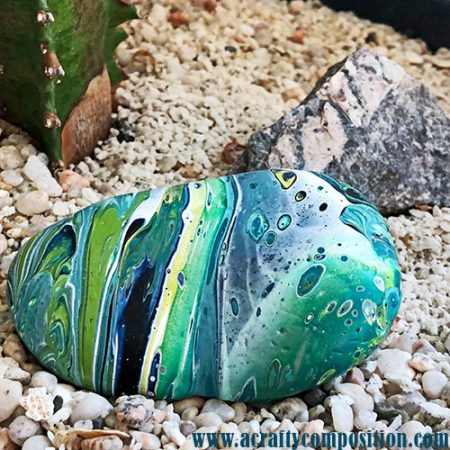
Now that you have the whole top (and sides) of your rock covered, you will notice that the paint is settling into a nice flat layer of beautiful swirling colors. You also might notice some circles or ‘cells’. You can bring out more of these cells by applying torch heat to your paint. These heat induced cells are usually much smaller but add so much amazing detail to your rock. Be careful not to hold the torch in one area to long as you don’t want to bubble or brown your paint. Literally 1 second per area is usually plenty.


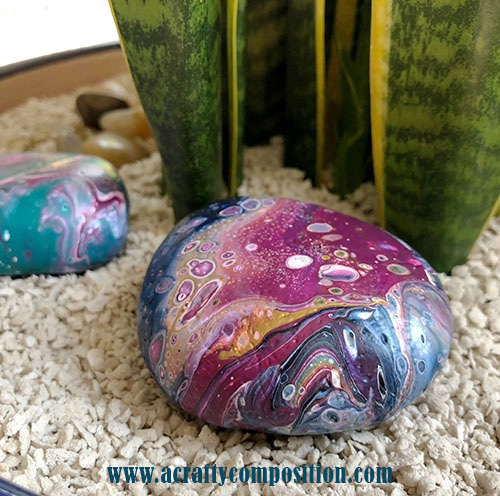
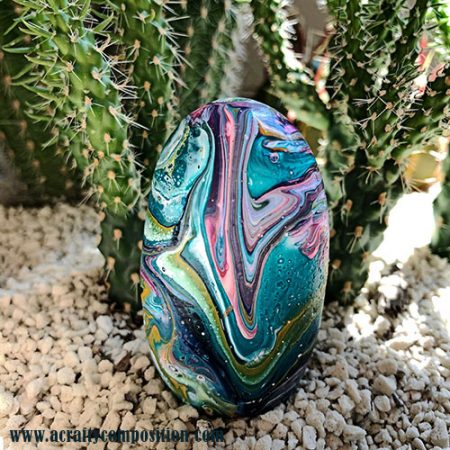
Do you see all the little dots of purple and blue in the middle part of this rock? Those are all heat induced cells. Probably one of the coolest things ever! Sometimes you get a lot of cells and sometimes hardly any but that is the beauty of this painting method. Every rock is like opening a present and being completely surprised.
Don’t forget to protect your art rocks with Rust-oleum Clear Gloss.
Wait 72 hours before sealing to ensure paint is completely dry.
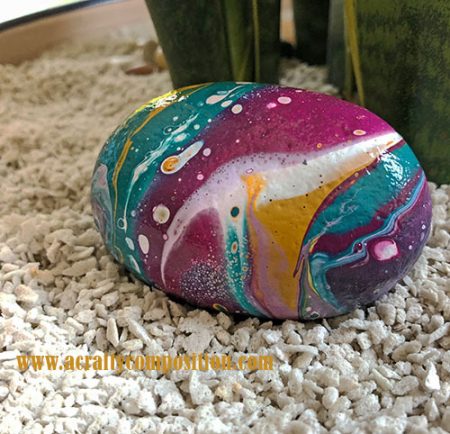
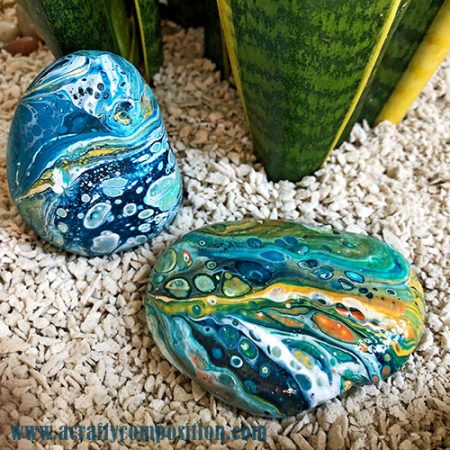
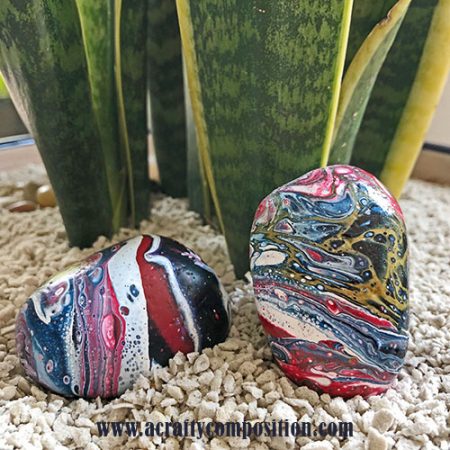
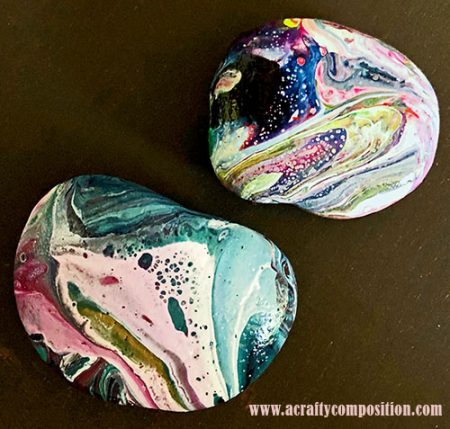
GALLERY
Here are some of the acrylic paint poured rocks I made this week using the three easy steps above. Oooooos and Ahhhhhhs are totally encouraged!
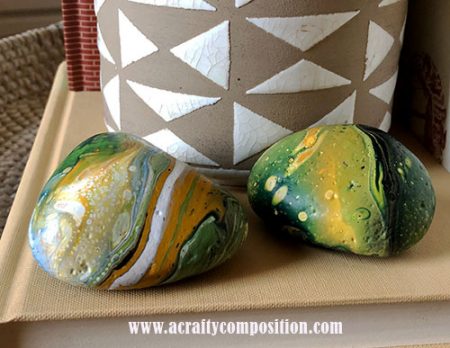


These Art Rocks have to be one of my favorite craft projects to date. I love the random shapes and how I’m continuously amazed at how creatively interesting and beautiful they are. I especially love the cells created by the silicone; scientifically spectacular. I hope you enjoyed learning about fluid paint pouring on rocks. Give it a try and if you have any questions please post to the comment section below or shoot me an email through the ‘contact me’ link. Feel free to pin, save, SHARE, like and all that jazz on social media. I’ve been working very hard at getting A Crafty Composition out there but I can’t do it without you guys. Have a marvelous week and as always, 
PS – to finish off the back of the art rocks for hiding/gifting/sharing, I simply paint the backs with gesso and adhere my labels BEFORE spraying the entire rock with Rustoleum Clear Gloss. If you haven’t heard about rock hiding or ‘kindness rocks’ head on over to my post GO PAINT A ROCK to read all about it.
Related Posts

5-Minute Mini Gift Bag
If you have followed A Crafty Composition for a while you know it is fairly…
January 26
Gum Nut Paper Garland
Have you ever seen a Eucalyptus tree blossom? It’s one of the most…
November 745 COMMENTS
COMMENTS (I love hearing from you!)


Ursula | 11th Feb 24
Hi
How do you finish the bottom? I would love them for my yard…will they fade?
Thank you
Ursula
PS where do you find decent size rocks like the size of a fist or larger?
Bärbel Stück | 9th Aug 23
Hallo JoElle,
ich bin überaus begeistert von der Steinmalerei, sie sehen so super aus. Heute werde ich am Bodensee Steine sammeln und sobald meine Farben geliefert worden sind, werde ich es ausprobieren.
JoElle | 22nd Aug 23
Hallo Barbel,
Danke für deinen Kommentar. Ich hoffe, Sie haben Spaß mit dem Prozess. Es gibt so viele kreative Möglichkeiten. Genießen
Diane | 21st Apr 23
Beautiful rocks. You did an awesome job. I’ve painted rocks for several years and tried it too. But I like the nail polish marbling myself and it’s sooo easy. No mixing, wastes nothing and uses less supplies. I use the cheap polish from $ Tree, water and an old, large cool whip container. That’s all you need. Oh and disposable gloves to keep your hands clean.
JoElle | 26th Apr 23
Thank you for your comment Diane! Your method with nail polish sounds super fun. Thank you for sharing it.
teresa woodard | 31st Jan 23
I love this idea of painting and putting a scripture verse and randomly put them around my neighbors garden areas without them seeing me of course! i have not painted rocks yet but I have a friend that collects them. Thanks for this! Happy crafting! T
JoElle | 8th Feb 23
Thank you so much for your comment. You are so welcome and I love that your are having fun with it and spreading positivity in your community. Kudos!!
Stephen Donnelly | 26th Aug 22
What a great tutorial. The rocks are absolutely beautiful. I have one question-what is the label you put on the bottom of the rock. I will be trying rock painting with my grandchildren. Thanks again for sharing your wonderful talents with us.
JoElle | 1st Sep 22
Thank you so much! What a great project to do with your grandkids. I love that it is a perfect creative project for all ages.
The label on the bottom of the rock can serve two purposes: 1) you can place a positive quote or message for whomever finds your rock (if you will be hiding them), 2) You can provide info on how the finder can post a picture of the found rock on a local rock painting Facebook page you belong to. For example, when I lived in Arizona I was a member of the Fountain Hills Rocks Facebook group. Someone found one of my rocks that I placed at an airport. She posted a picture and then hid it at another airport for someone else to find. Someone found it and posted a picture – in Alaska! It’s fun to see how far the rock travels. Of course, people who find your rocks don’t have to re-hide. Many people choose to keep it – at least for a little while.
I hope that all makes sense. There are rock painting groups all over the world or you can check out The Kindness Rocks Project.
Lindy | 3rd May 22
Is there anything that can be done with all the paint that puddles. It just seems like such a waste of paint OR I may be using too much paint, any suggestions? This is so much fun!
JoElle | 11th May 22
Hi Lindy! I usually save some smaller rocks to swirl into the puddles. You can place a few drops of the lubricant oil on the puddle and use a toothpick to do a bit of marbling then dip the smaller rocks into the puddles. Don’t forget your rubber gloves – it’s quite messy. You can also use a spatula and gently scoop the puddle (trying not to “stir” it) and drizzle the paint onto smaller rocks. I’m so happy you are having fun with these!
marge George | 6th Apr 22
I always get a blob of paint on the bottom of the rock from the rack. How can this be eliminated??
JoElle | 11th Apr 22
Yes, that happens to me too. I simply wait until the paint is dry and use an X-acto knife/sand paper to get the bottom cleaned up. Then I paint the bottom of the rock black. Then I seal the entire rock. Hope this helps. Thank you for your question.
Michelle | 23rd Sep 21
The links for the squirt bottles and the cups are not listed here can you please tell me what ones you use and purchase from Amazon? Thanks
Laurie | 15th Jul 21
Have you ever used nail polish for rock painting?
JoElle | 28th Jul 21
I have not-but it’s a cool idea. Have you tried it?
Rae | 13th Jun 21
My question
How do I alleviate the rack marks from the underside of the rocks as they are drying n the rack on the cookie sheet?
Will there not be lines on the rock where it sits on the rack?
Another question. How Ingrid does it take for the paint to dry, ( hrs, days?) and when do you spray the sealant over the rock?
Thank you for your instructions. Rae
Paula | 3rd May 21
Beautiful! Do you prime the rocks first? It looked like the rock in technique A was painted white. Do you have a video?
Thanks!
JoElle | 13th Jul 21
Sorry for the delayed response Paula. Yes. I prime my rocks with either black or white gesso or paint. I do have a couple rock painting videos on my YouTube Channel. Just type in A Crafty Composition in the YouTube search bar. Thank you for your comment and happy crafting.
Jackie | 26th Nov 20
These are such beautiful rocks. Thank you SO much for going into so much detail in describing the “how to’s” in creating these beut’s. I can’t wait to create them. Now, I think I can create with confidence thanks to you! This will be fun. I have a few items I need. Now I just need all the liquids (less paints and protective sprays). I will continue to refer to your document and follow your instructions. I think those cells are the coolest. I want to make some for my BIL that look like space with shooting stars (a tail on a cell maybe, we will see). Sky is the limit. Thank you so very much once again! Jackie
JoElle | 26th Nov 20
Thanks so much for your comment Jackie. I too LOVE the ‘cells’. The entire process is like magic and it’s always a surprise what you end up with. I’m thrilled that you find the post useful – hopefully you’ve hopped over to my YouTube Channel as well for additional rock painting tutorials. Have fun with the process; your shooting star idea sounds amazing!
Lucy Sky Diamond | 11th Nov 20
Very beautiful work, JoElle! From one artist experimenting with fluid acrylic projects to another, kudos for your efforts in sharing (what I think is) a brilliant and efficient process to achieve results one can be proud to share with the world, which I have found to be nearly identical to my personal method I’ve been sticking to after months of trial and error, and that helped me feel more confident that I’m doing my best and not missing anything. Double kudos for spending your time investing in the materials to be able to give the gift of a smile every time someone finds a rock! =] you are one of the good ones in this world and I think I speak for everyone who visits this page when I say we appreciate you!
JoElle | 14th Nov 20
Wow Lucy – super sweet comment and I so much appreciate the time you took to post it. Thank you for checking out the blog and I hope you continue to find joy through the creative process.
Cassie Spangrude | 1st Nov 20
JoElle, what do you do to the underside of the rock? I’ve seen some that seem to be neatly poured just on the top with a natural rock edge around it (like the pour had been controlled or ? masked or ?)
JoElle | 1st Nov 20
Thanks for you question Cassie. I tend to let my paint roll down the edges when I do a pour. I use a razor blade to clean off any paint blobs on the bottom and then add a coat of black primer and my usual label. I think, if you wanted to leave the edges of the rock natural (without paint), you could mask with frog tape and then run a razor blade around the top of the tape before you pull it off. Let me know if you come up with something that works. Thanks again for your comment and enjoy your rock painting!
Elaine | 17th Aug 20
This is the most interesting “new” technique I have ever seen and look forward to trying it as soon as I can get all the ingredients. Sounds like such fun too!
JoElle | 18th Aug 20
Thanks for your comment Elaine! It is fun – addicting actually. I love the unpredictability of the patterns and the ‘cells’ are the coolest. Enjoy!!
Linda | 19th Jun 20
What about using a hair dryer
JoElle | 22nd Jun 20
Hi Linda. Do you mean to “move” the paint or to speed up the drying process? I have definitely used a hair dryer to help speed up the drying process. Works great.
vanessa nutbean | 5th Jun 20
hello I live in the uk and to purchase floelle and gac 800 is very expensive and it has to be shipped in with up to a 50 dollar shipping cost. the treadmill oil is easy to get can you suggest an alternative for these i really want to try these fluid rocks they are beautiful. what about liquitex and other brands that are recommended on amazon?
kind regards vanessa
JoElle | 5th Jun 20
Hello Vanessa. Thank you for checking out A Crafty Composition. I’ve looked onto the UK Amazon site and I think the following products will work to replace the Floetrol/GAC 800:
EFCO Pouring Fluid, Deco Art Pouring Medium, or Pouring Plus Medium for Acrylic Flow Technology. I don’t have any experience with these products so I cant speak personally on their use or the ratios – I would just follow the ratio instructions on the bottle and then adjust until you get a good flow. I hope that helps. I would love to hear back from you with results for all the UK rock painters out there. Have fun!
Sherry Smelley | 3rd Jun 20
Need some “math” help. I have no idea how to figure out the Floetrol .amount of 33 to 44 per oz And Golden GAC 800 at the amount of .33 to .50 per oz.
Just not very good at reductions with mediums.
JoElle | 4th Jun 20
Hi Sherry! The important thing to remember is that you DO NOT have to be exact. Basically you are looking for good flow and movement and that can require more or less GAC 800 and floetrol depending on the acrylic paint you use. These little medicine cups make it very easy to measure. The rough formula is for every 1 ounce of paint, add about 12 ml of GAC 800 and 12-15 ml of Floetrol. If you don’t have these medicine cups,for every 1 oz of paint, add a scant Tablespoon of GAC800 and a scant Tablespoon of Floetrol. For 1/2 an ounce of paint that would be about 1.5 teaspoons (7ml) each of GAC800 and Floetrol. For 2 ounces of paint, that would be a bit shy of 2 tablespoons (30ml) each of GAC800 and Floetrol. HONESTLY, don’t worry too much about the measurements as they are just recommendations. Just watch the flow of the paint. You will learn over time what your perfect balance is. AND DON’T FORGET the lubricant! That is what makes those gorgeous ‘cells’ I hope you have fun with this technique – I’ve also used it on ceramic pots in this blog post: Paint Poured Pots
Barbara | 3rd Jun 20
This is a great idea! Can they be left outside? Or would you have to use exterior paint?
JoElle | 4th Jun 20
Hi Barbara – Great question. You definitely want to spray them with a sealant before placing them outside. I like Rust-oleum 2x Ultra Cover Clear Semi Gloss. It is UV Resistant. Happy Painting!
Lori | 25th May 20
Have you ever tried this method on seashells?
JoElle | 25th May 20
I haven’t but what a cool idea. I’d love to hear about it if you try it!
Dilles | 20th Aug 18
Can you use a heat gun instead of a torch?
JoElle | 20th Aug 18
Thanks for your question. I tried my Milwaukee heat gun and it is not as effective. I just used one of those long candle lighter sticks but you can use a kitchen torch as well. Happy rock painting!
Donna | 17th Aug 18
Beautiful.
JoElle | 19th Aug 18
Thank you Donna! Thanks for checking out the blog.
Elizabeth | 16th Aug 18
I love this. They are beautiful!
JoElle | 19th Aug 18
Thanks Elizabeth. They are so fun to make – each one is a complete surprise.
Lisa | 15th Aug 18
They are so BEAUTIFUL!!!! Nice work.
JoElle | 19th Aug 18
Thank you so much Lisa.