Adorable Prickly Pin Cushion
You can complete this fun Cactus Pin Cushion in about an hour. It makes a perfect gift for quilters and crafters or a fun addition to a laundry room where a variety of pins and needles can be stored for quick mending jobs.
Ingredients
For Cactus
- 1 9" x 18" fabric piece (or any size with length twice the width
- 1 small bag stuffing, preferably cotton but poly works
- 1 skein embroidery floss in coordinating color
- 1 spool strong thread in coordinating color
- 1 each needles; regular and long upholstery
- 1 3/4" to 1" button with 2 holes
For Pot
- 1 4" tall, 4" top diameter pot with hole in bottom; metal or plastic preferred
- 1 circle cardboard; cut to the diameter of bottom of pot
- 1 circle felt; cut slightly larger than the cardboard circle
- 1 tube E6000 or other fast drying craft glue
- 1-2 small pieces Styrofoam; trimmed to fit into pot
- 1/2 cup small rocks or dried beans to weight the pot
For Flower (HINT: You can use a silk flower if you don't want to hassle with making the felt flower.)
- 18-20 1" x 1" squares of felt for outside petals
- 7-9 3/4" x 3/4" squares of felt for inside petals
- 1 1.25" circle cut from cardboard or poster board
- 1 1.25"+ circle cut from felt (slightly larger than cardboard circle)
- 6 inch piece of narrow ribbon or yarn for flower center
- 1 E6000 or other fast drying craft glue
- 1 bag clothes pins
Instructions
TO MAKE THE CACTUS
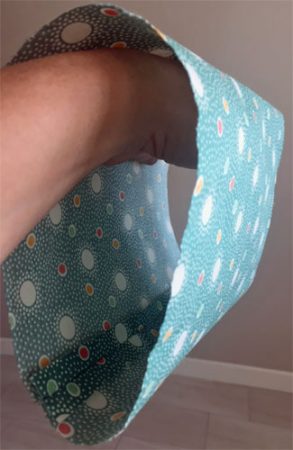
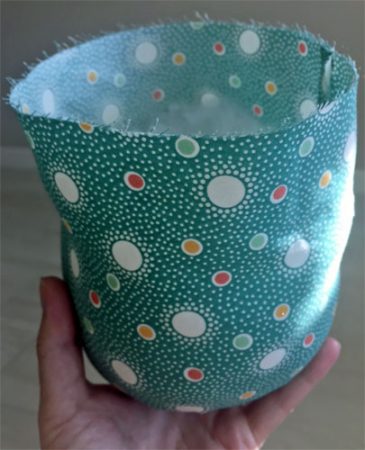
- Fold 18" length of material in half so that the right sides (good sides) of the fabric are together. Stitch a 5/8" seam with thread (this is the only part I used the sewing machine for) to create a fabric 'tube'. Turn the tube right side out (seam on the inside)
- Using an 18" long piece of embroidery floss and needle, make a basting stitch along the bottom of the fabric 'tube'. The stitch should be about 1/2" to 5/8" from edge of fabric. PLEASE NOTE: You are not sewing the tube shut but rather stitching all the way around it.
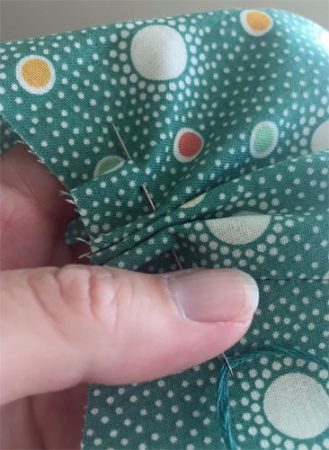
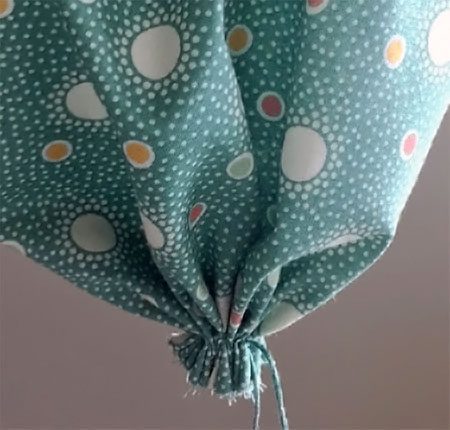
- Pull the basting stitch so that you are evenly gathering the bottom of the tube shut. Tie a good knot. Wrap the floss once or twice and make another knot - you don't want this popping open. LEAVE THE LEFT OVER FLOSS for now.
- Now your fabric tube is more like a fabric 'cup'. Fill it with the stuffing. Use a wooden spoon or spatula to push the stuffing down. Keep filling it and packing it until the stuffing is about 1" from the top of the fabric cup. YOU WILL USE A LOT OF STUFFING! You want it quite firm.
- Using a new 18" long piece of embroidery floss, make another basting stitch on the around the top of the fabric cup. Again, your stitch should be about 1/2" to 5/8" from the fabric edge.
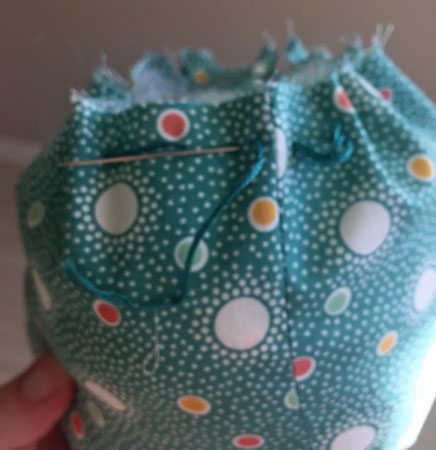
- Pull this basting stitch while evenly gathering the top of the fabric cup shut. Now you have a fabric ball. Your ball should be firm. If it isn't, loosen your top basting stitch and pack more stuffing in. Once you are satisfied with the firmness of the fabric ball, make sure your embroidery floss is gathered tight and make a good knot. Leave the left over floss for now.
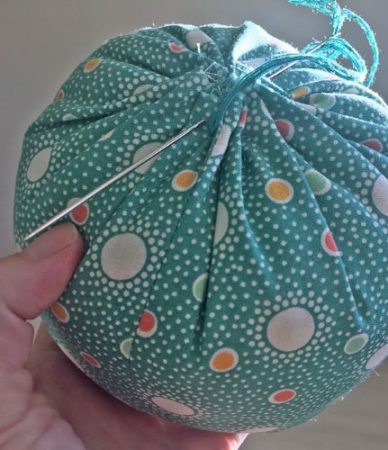
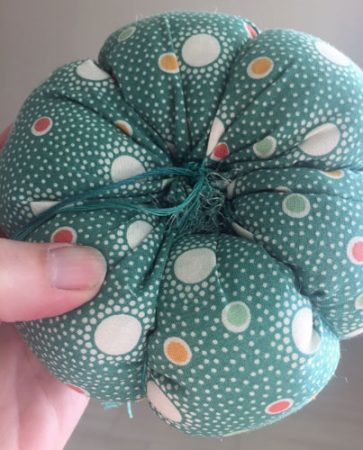
- Thread the long upholstery needle with about 24" of embroidery floss. Run the needle up through the middle of the fabric ball. It doesn't matter which end. Tie the tail of this floss to the leftover floss from the basting/gathering stitch. Bring the needle/floss down the side of the ball and back up through the center of the ball. Pull nice and tight. You are making the ribs of the cactus. Do this 6 or 7 times, pulling the floss tight each time. Stop with your needle on the opposite end from the end you first entered the needle into; the opposite end of where you tied the embroidery tail to the leftover floss. Tie this piece of floss to the leftover floss from the basting/gathering stitch. Make sure you make really good knots and keep everything nice and tight. Your ball will now look like a pumpkin with a belly button. Go ahead and trim all your floss tails to about an inch.BONUS: You now know how to make a fabric pumpkin.
TO MAKE AND ATTACH THE POT
- Glue the felt circle to one side of the cardboard circle. Place the circle on the bottom of your pot and flip the pot right side up. Make sure the felt circle is positioned correctly under you pot. Reach into the pot with a pen and trace the circumference of the pot's hole onto the cardboard circle. Remove the cardboard circle. With a hole punch or ice pick, make two holes opposite each other on the circumference line. Your cardboard circle should look like a really big button. Glue the cardboard piece onto the bottom of the pot - NO FLOSS at this point - YES, PLEASE ignore the floss in the picture.

- It took me a few tries to figure out the best order to do this next step. PLEASE NOTE: the needle and thread in this picture is going in the WRONG DIRECTION. You will be going from the top of the cactus down INTO the pot AND you will not be adding the rocks or beans until the end.
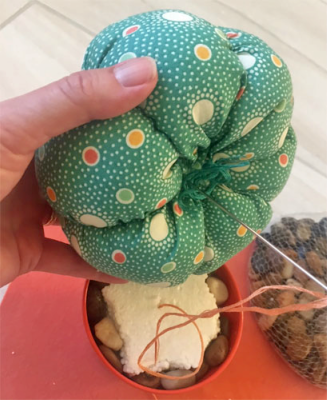
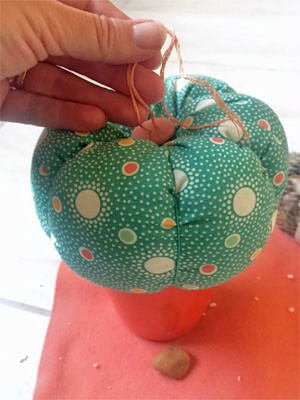
- Decide which end is the top of your cactus. Place the 1" button over the 'belly button' at the TOP of your cactus (make sure all the previous floss ends are tucked under the button). Insert your needle down through one hole of this button. IMPORTANT: MAKE SURE YOU DON'T PULL YOUR FLOSS ALL THE WAY THROUGH. You need to keep about a 6" floss tail out the top of the button. Continue moving the needle through the center and out the bottom of the cactus, down through the styrofoam and through one of the holes you made in the cardboard circle at the bottom of your pot. Now come up the other hole at the bottom of the pot, up through the styrofoam, up through the bottom of your cactus and up through the opposite button hole at the top of your cactus. Make sure you are keeping hold of the 6" tail piece and repeat the entire thing... down through the button hole, into the cactus, into the styrofoam, into the first cardboard hole then back up the opposite cardboard hole, up the styrofoam, up through the cactus and out out the button hole. Now you have your 6" tail piece of floss and the needle end of the floss coming out opposite holes of the button on top of your cactus, BUT WAIT! Before you tighten everything up, keep some slack in the floss so that you can pour the rocks or beans into your pot. NOW you can pull floss tight! You want that cactus top nice and taught against the rim of the pot. Once it is tight, make a good knot with the two floss ends on top of the button. Make another knot - and maybe one more for good measure.
To Make The Flower
- You can simply glue a silk flower onto the button on top of your cactus and voila...OR you can make the felt flower by following this awesome tutorial at http://www.notmartha.org/tomake/to-make-diy-mothers-day-corsage-felt-dahlia-flower-brooch/ . The felt flower requires a little bit of patience but I love the look. Once you are done with the felt flower, simply glue it onto the button at the the top of your cactus. PLEASE NOTE: The flower for this cactus pin cushion is smaller than that made in the Dahlia Brooch tutorial. I used about 18 to 20 1" felt squares for the outer two rings of petals and about 7 to 8 3/4" felt squares for the inner petals. These sizes are mentioned above in the Ingredients list.