
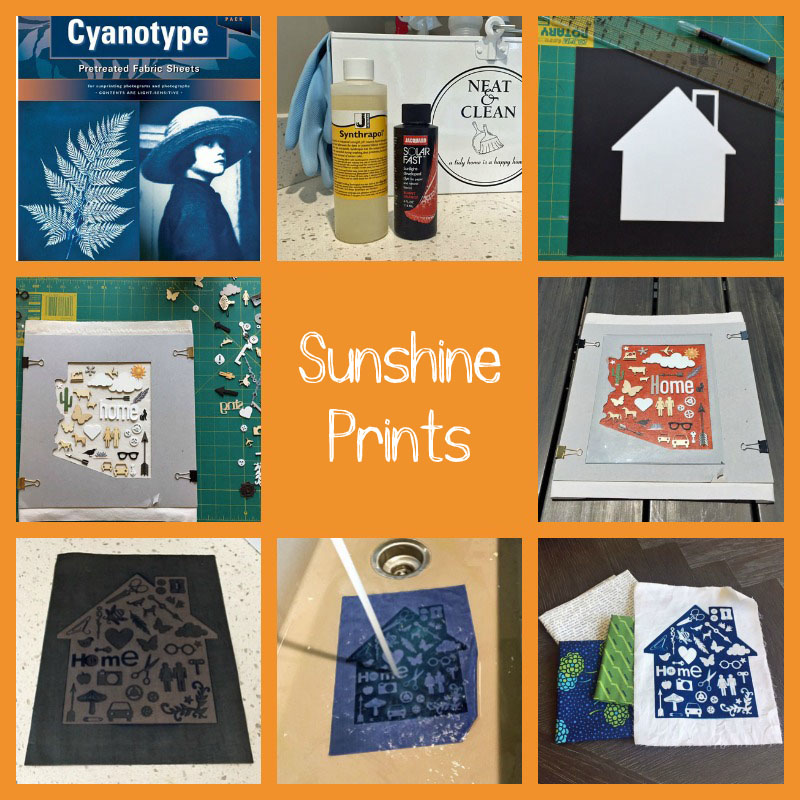
Sunshine Prints
The Monsoons are here! I love the thunder and the smell of rain in the desert. It is so wonderful, after weeks of running the air conditioner 24/7, to slide open a window and listen to the rolling rumble. Even during the monsoons though, there is one thing Arizona has plenty of – sunshine. This week I took advantage of the sun’s rays to create some cool fabric prints. These sunshine prints can be used for pillows, totes or even just a wall hanging and are super easy (and a little bit addicting). There was a little bit of a learning curve but I think I figured out the best way to get good results. I hope you enjoy this printable “craft recipe” and get inspired to create some of your own sunshine art.
DON’T MISS THE GOODIES AT THE BOTTOM
Check out the product links and special notes for this project at the bottom of this post.
Sunshine Prints
Ingredients
General Ingredients Needed for BOTH PROCESSES
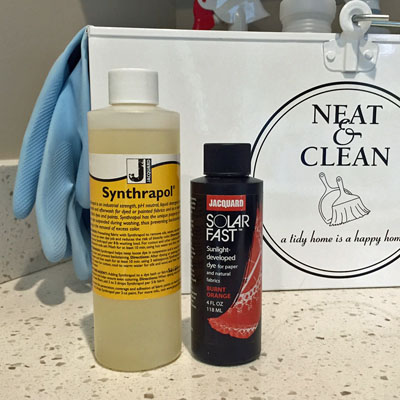
- Synthrapol Liquid Detergent, JACQUARD
- Template made from cardboard or dark cardstock
- X-acto knife & ruler or Scissors
- Piece of smooth cardboard, at least 2" larger than your template
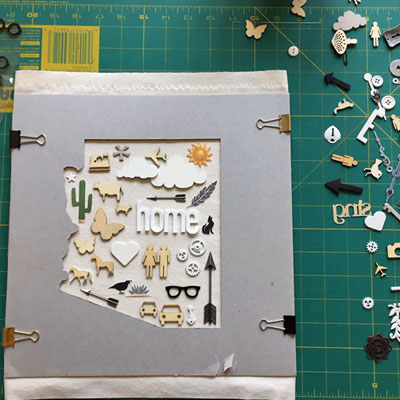
- Piece of glass, at least 1" larger than your template (I took mine from a picture frame)
- Medium binder clips
- Variety of stickers, trinkets, leaves and/or shapes, flatter is better
- A sink for rinsing
- SUNSHINE
Ingredients for Liquid Dye Process
- Solar Fast Sunlight Developed Dye, JACQUARD
- 100% Cotton Fabric, I used Heavy Muslin
- Paint brush, about 1" wide
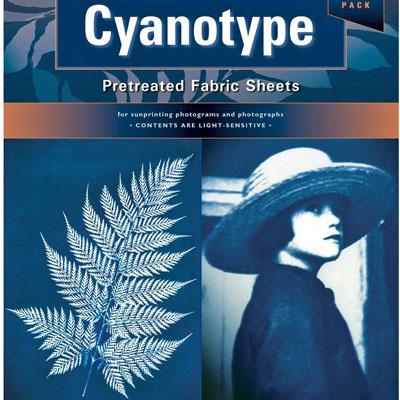
Ingredients for Cyanotype Process
- Cyanotype Pretreated Fabric Sheets, JACQUARD
Instructions
GENERAL INSTRUCTIONS For: Both Processes
- If you are using YOUR OWN FABRIC (liquid dye process only), pre-wash it with Synthrapol - I used about 1 Tablespoon in my washing machine detergent dispenser. WASH WITH HOT WATER then dry your fabric. Ironing is recommended.
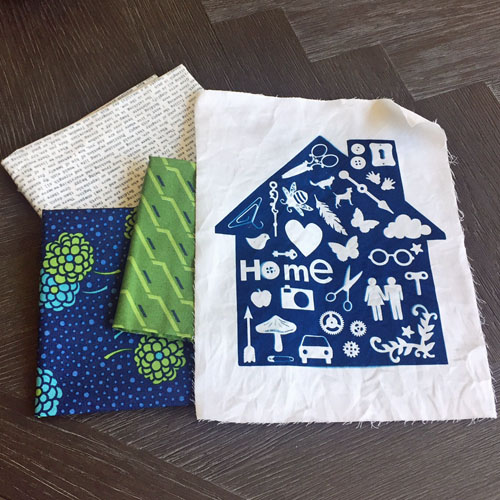
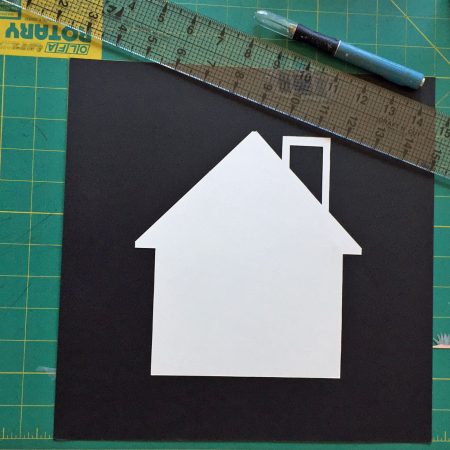
- Make A Template: pick a simple shape that is easy to cut out. Think big monogram letters, silhouette of a state or country, basic shapes like heart, house, dog ... Use Google Images to look for 'Silhouette shapes' then print and cut. IMPORTANT! make sure your image is cut out of the middle of a larger piece of cardboard or dark colored cardstock. SIMPLE WHITE PRINTING PAPER WILL LET THE SUN THROUGH!
- Working in a dim room with no sunlight, layer a piece of cardboard on the bottom for stability. Then place your fabric OR Pretreated Fabric Sheet. Then place your template. Binder clip all that together around the edges to prevent moving.
- Now you are ready to move on to the specific directions for whichever process you are using.
INSTRUCTIONS FOR: Liquid Dye Process
- Make sure you read the General Instructions first - especially about pre-washing your fabric. Also, with this process YOU MUST WORK FAST! Have your trinkets, stickers etc. already picked out and have an idea of where you want them.
- The benefit of using the Liquid Dye Process is that you have color choices whereas Cyanotype is always blue. IMPORTANT TO NOTE: Certain colors of the Solar Fast dye are harder to wash out in the end process - THEY MAY STAIN YOUR FABRIC YELLOW in the areas you want to be white! These colors are: Golden Yellow, Green, Teal, Avocado, Sepia and Black
- WORKING IN A DIM ROOM WITH NO SUNLIGHT: Pour about 2 tablespoons of Solar Fast Dye into a durable cup. Use your paint brush to apply an even layer of the dye to your fabric. Make sure you paint an area about 1/4" to 1/2" larger than your actual cutout shape in case your template shifts a little.
- Working quickly so that your dye does not dry, place your trinkets, stickers etc. down on the fabric. The sun will NOT color the areas covered by these shapes.
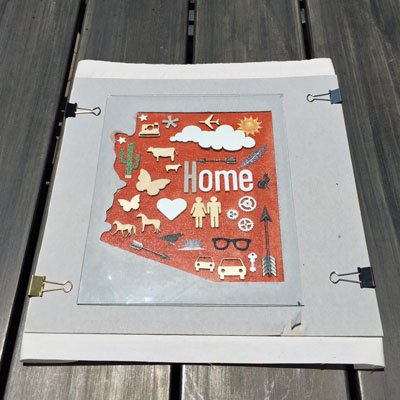
- Place the glass over the top of your shapes and VERY CAREFULLY, place your project out in the direct sun (noon-2pm is the best time as the sun is directly above and will not cast shadows).
- Development will take from 5 to 20 minutes. Over exposure is always preferable to under exposure. I almost always do 15 minutes.
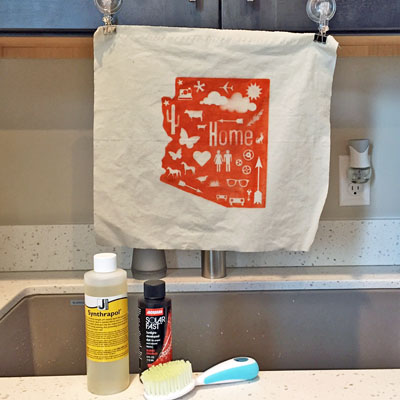
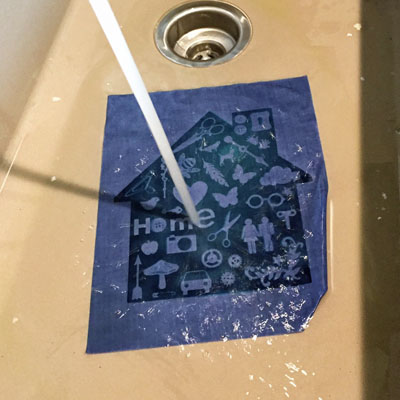
- Take your project inside to a sink. Remove the glass, trinkets, template and binder clips. Rinse your fabric with HOT water. I gently use a baby brush to help get the dye out. Rinse for 5 minutes or until the water runs clear. Fill the sink with fresh hot water and pour about a lidful of Synthrapol into the water. Keep agitating your fabric in the water for another 5 to 10 minutes. Rinse well and dry.
INSTRUCTIONS FOR: Cyanotype Process
- Make sure you read the General Instructions first
- Working in a dim room with no sunlight, place your trinkets, stickers etc. down on the fabric. The sun will NOT color the areas covered by these shapes.
- Place the glass over the top of your shapes and VERY CAREFULLY, place your project out in the direct sun (noon-2pm is the best time as the sun is directly above and will not cast shadows).
- Development will take from 5 to 15 minutes. Over exposure is always preferable to under exposure. I usually do about 12 minutes.
- Take your project inside to a sink. Remove the glass, trinkets, template and binder clips. Rinse your fabric with COLD water. I gently use a baby brush to help get the dye out. Rinse for 5 minutes or until the water runs clear. Fill the sink with fresh cold water and pour about a lidful of Synthrapol into the water. Keep agitating your fabric in the water for another 5 to 10 minutes. Rinse well and dry.
JUST A FEW NOTES:
The main difference between the end results of the Solar Fast Liquid Dye Process and the Cyanotype is that the Solar Fast gives you some color options while the Cyanotype is always only blue. The Cyanotype is a little less messy and it does give you a little bit of a crisper image though. Choices, choices, choices…
Here are a list of items I have successfully used as shapes on my Sunshine Art projects
- Stuff from home: safety pins, keys, paper clips, buttons. . .
- Stuff from nature: leaves, flowers and stems (a little limited in Arizona as it’s mostly cactus – ouch!)
- Stuff from your craft supplies: Alphabet stickers, charms, laser cut wood shapes
- JUST REMEMBER, THE FLATTER THE BETTER; SO THEY DON’T CAST A SHADOW
Here are some other links to products I used. All of these can be purchased at Amazon but I also like to shop local art supply stores. Also, the Jacquard website is a wealth of information and problem solving. Here’s their link: Jacquard: Solar Fast
Jacquard Solar Fast Dye , comes in 14 colors BUT READ the note in my instructions about fabric yellowing. I tried teal first and I was very sad as it stained my fabric a yellowy green color where it should have been white. In the Arizona sample picture, I used Burnt Orange
Synthrapol, This can be used to both pre-treat your fabric and as an after wash to help remove the dye. IT REALLY DOES HELP to pretreat your fabric as it often has sizing and dust on it which can mess with your dye.
Cyanotype Pretreated Fabric Sheets , comes in different quantity packs and also in different types of paper if you don’t want to work with fabric.
I hope you enjoyed this project. Please share your sunshine art at the comment section below.
Related Posts

5-Minute Mini Gift Bag
If you have followed A Crafty Composition for a while you know it is fairly…
January 26
Gum Nut Paper Garland
Have you ever seen a Eucalyptus tree blossom? It’s one of the most…
November 74 COMMENTS
COMMENTS (I love hearing from you!)


Tania | 26th Jul 17
Wow, that’s cool!! I’ve never heard of Cyanotype before.
Tania
JoElle | 27th Jul 17
Hi Tania. Cyanotype is always that amazing blue color – like true blueprints. You can get the pre-treated medium as paper or fabric. I plan on making some pillows or totes with the ones I did. Thanks for checking it out.
Vikki | 26th Jul 17
What a great craft and great idea. Yours turned out beautifully. Thank you for doing all the testing for us and giving us all the hints to make ours turn out great too.
JoElle | 27th Jul 17
You are very welcome Vikki. It was a fun project and really quite easy – especially the cyanotype pretreated fabric sheets. Thanks for following.