
5-Minute Mini Gift Bag
If you have followed A Crafty Composition for a while you know it is fairly rare that I come up with a craft project that only takes five minutes. Perhaps never in fact. Well, there’s a first time for everything and these too-cute mini gift bags truly take only 5 minutes to make. They also happen to be the perfect way to share last week’s homemade sugar cubes. So put the kettle on, pour yourself a cuppa and let’s get started!
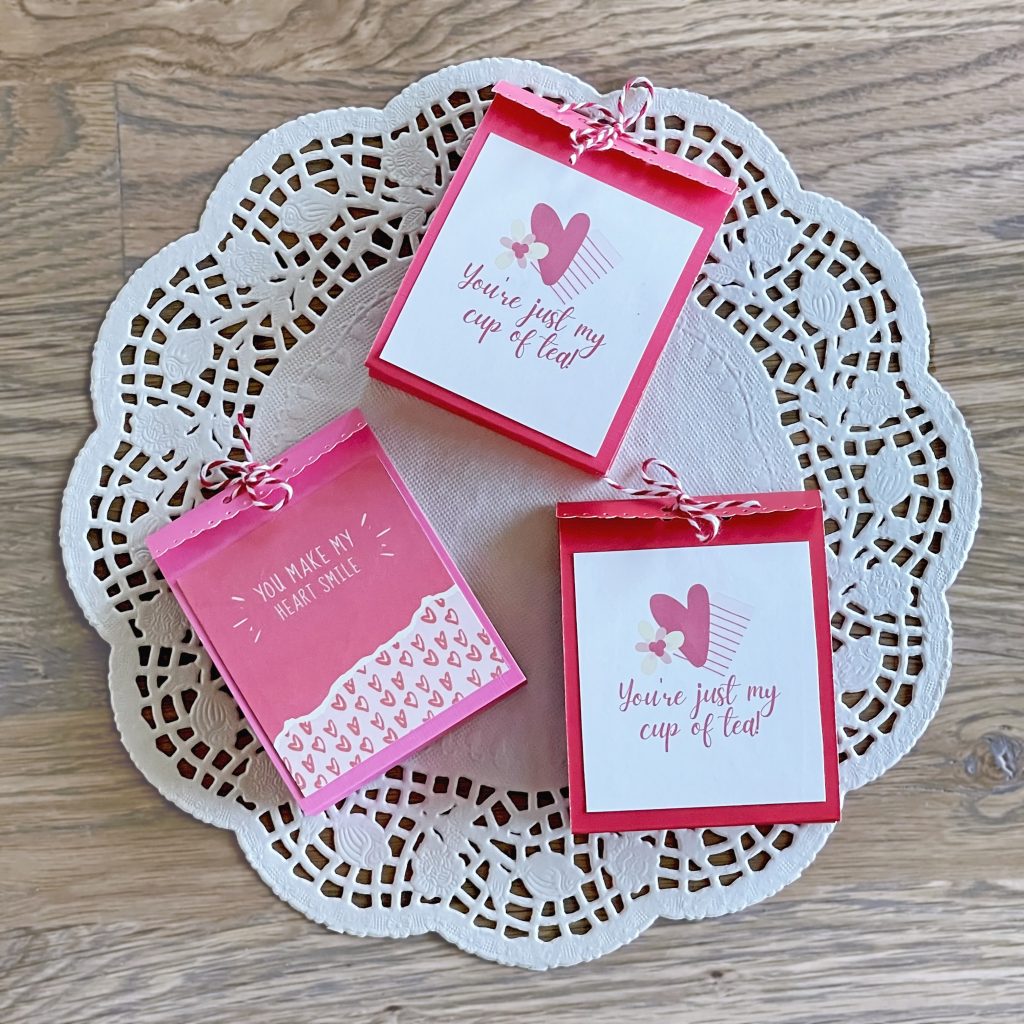
While the water’s boiling, let’s chat about these mini gift bags. First, you don’t have to put tea and sugar cubes in them. You can fill them with chocolates or skittles, bath salts or sugar scrubs, margarita rim salts or BBQ rubs. The possibilities are endless and because I know you are clever, you will think of the perfect punny sayings to go along with your themes. There isn’t a holiday or an occasional these mini gift bags wouldn’t be perfect for.
The Mini Gift Bag Supply List
Now that your tea is steeping, let’s look at the simple supply list for the mini gift bag. You will already have many of these items at home. Keep in mind, you will get four gift bags from one piece of 8.5″ x 11″ cardstock – five if you are using 12″ x 12″ cardstock.
- 8.5 x 11 colored cardstock or double sided patterned paper
- Ruler
- Pencil
- Paper trimmer and/or scissors
- Paper piercer or sewing needle
- Optional – decorative border punch
- 1/8″ hole punch
- paper adhesive like Towbow or a glue stick
- 7″ of twine, embroidery floss or ribbon, per gift bag
- Stapler or mini stapler
- 2″ x 3″ cellophane bag for sugar cubes or other treats
- A Crafty Composition’s downloads (see below)
The FREE Downloads
You know I LOVE giving freebies so here are the THREE downloads you will need to make my version of these adorable mini gift bags. I think these are the perfect little winter pick-me-ups for a friend, teacher or family. Just click on the buttons below and print.
Gift Bag Instructions
There are THREE ways to learn how to make these simple mini gift bags. First, you can simply click on the Template & Instructions button above and print out the instructions. Secondly, you can watch my four minute YouTube video HERE. You may want to do this regardless because it really clarifies the instruction – also it has some really snappy music and . . . the more views the better (a little shameless promoting here).
Finally, you can check out the instructions with coordinating pictures below. I’m a visual learner so I find pictures are always helpful.
Gift Bags: Step One & Two
Lay your 8.5″ x 11″ cardstock sideways (landscape). Make a cut every 2.75″; this gives you four strips at 2.75″ x 8.5″
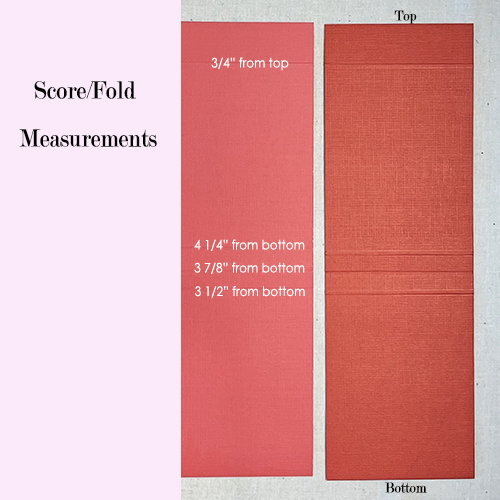
Now, make 4 fold/score marks on each of the strips. Measuring from the BOTTOM, your first score is at 3 1/2″ then 3 7/8″ and 4 1/4″. Make your final score at 3/4″ from the TOP.
How do you make the perfect fold you ask? Well there are two ways to make crisp folds.
- Measure and mark where you want your fold. It’s best to measure and mark each opposing side of the paper and then use a ruler to connect the marks. Then, simply run a stylus along the ruler and you will have a perfect score mark. OR
- Get a scoreboard. I promise – you will never regret the purchase!!
Gift Bags: Step 3 & 4
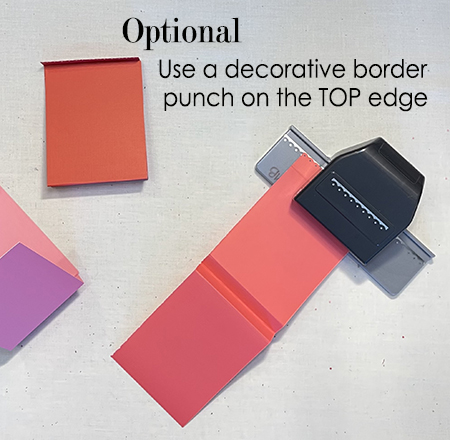
If you wish, use a border punch to create a scalloped edge on the top of each strip. I like this one from FISKARS.
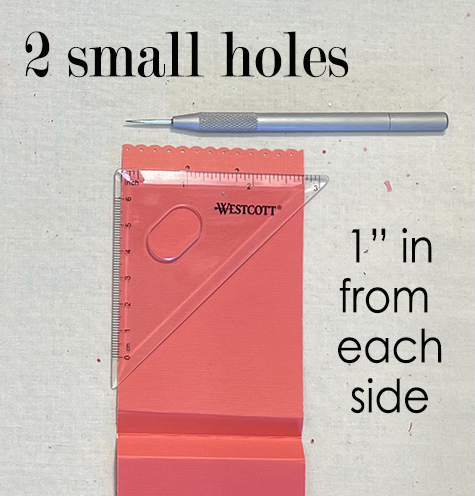
Next, above the top 3/4″ fold, make two centered holes, 1″ in from each side. You can use a paper piercer, push pin or sewing needle to do this.
This next part is more clearly shown on the YouTube video
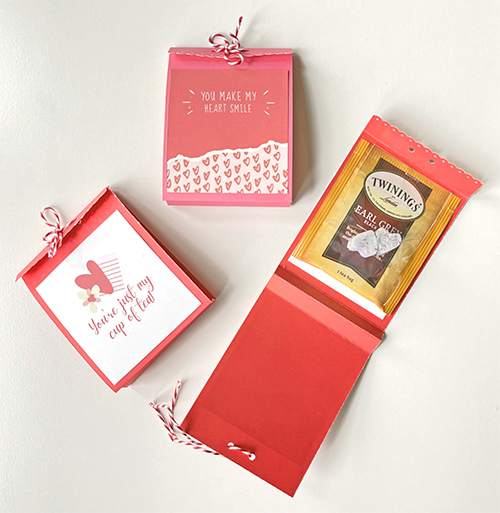
Now fold the gift bag up, aligning the top flap over the bag’s front. Use the two previously poked holes as a guide to make two holes in the bag front. Make sure not to poke through to the bag back.
Unfold the bag and use a 1/8″ hole punch to create a proper hole over the small holes you previously made. You will end up with two 1/8″ holes on the top flap and two 1/8″ holes on the gift bag front. You will use these to run string or ribbon through to keep the gift bag shut.
Gift Bags: Step 5 & 6
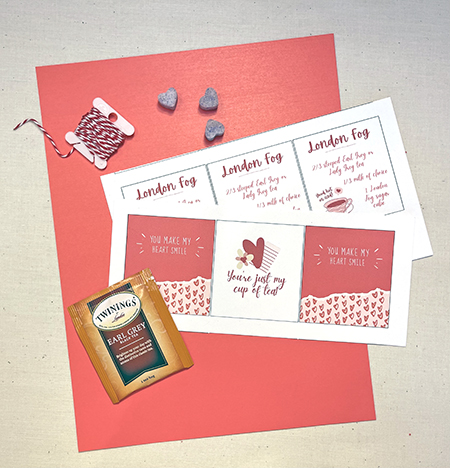
Print and cut the Front Gift Bag Saying and the London Fog Recipe. The links for these documents are in the FREE Download section above.
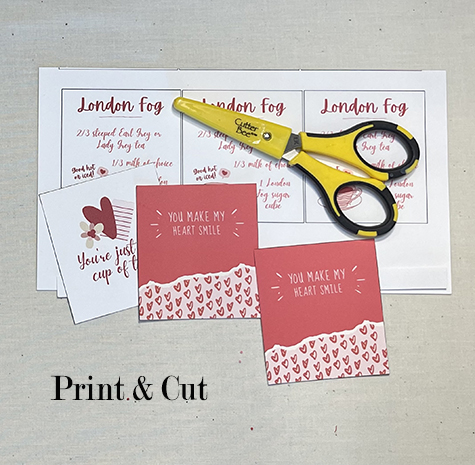
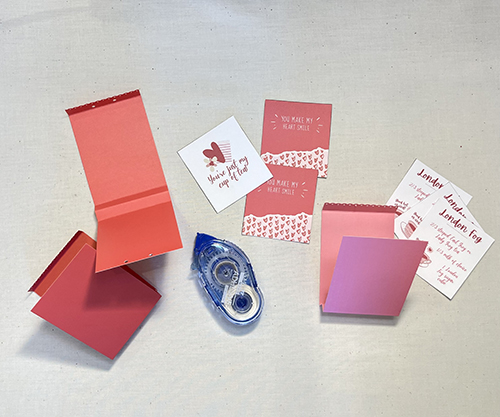
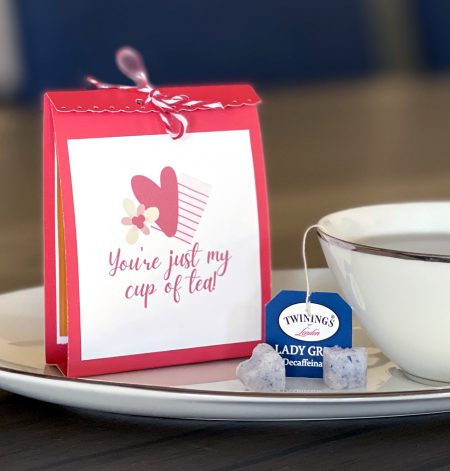
Using paper adhesive or a paper glue stick (see supply list for recommendations) adhere the London Fog Recipe to the inside of the gift bag (below the scalloped top fold. Adhere the Saying to the gift bag front – making sure to leave room for the scalloped flap.

Place your homemade flavored sugar cubes (or other treat) in the cellophane bag and seal it. Staple the tea and the sugar cube bag to the inside back of the gift bag.

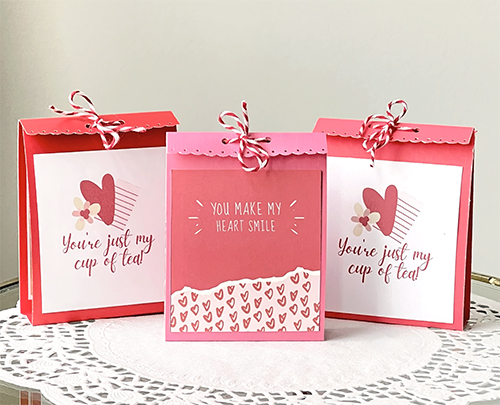
Finally, add the twine or ribbon to hold the mini gift bag shut. To do so, bring your twine down through the left side and up through the right. Tie a bow so that the gift bag is easy to open.
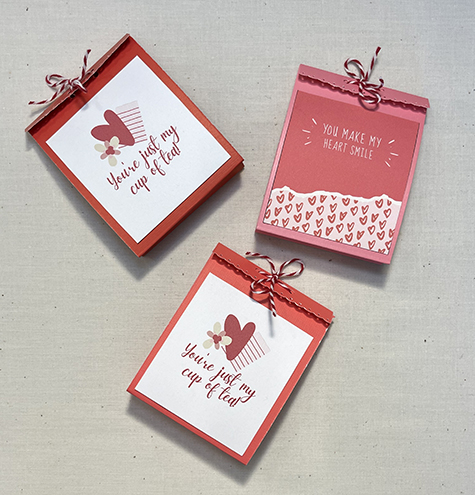
And that is it! Making these sweet mini gift bags is as easy as making a cup of tea. Enjoy!
PIN ME on PINTEREST! (p SAVE)
Well lovelies, I hope you enjoyed this quick tutorial. I always love to hear from you so leave your comments below. If you enjoyed my YouTube video you can give me a thumbs up and subscribe to my YouTube Channel – that way you will always know when I put a new video out there.
and finally . . .
PIN ME!
If you are a Pinterest lover, check out A Crafty Composition’s Pinterest account by clicking RIGHT HERE. You will find all sorts of crafty goodness there.
Until next time, stay healthy and stay crafty

Related Posts

Gum Nut Paper Garland
Have you ever seen a Eucalyptus tree blossom? It’s one of the most…
November 7
Polymer Clay Jewelry: A Beginner’s Perspective
One of the signs of a true artist, is the ability to make things look…
July 259 COMMENTS
COMMENTS (I love hearing from you!)


A Crafty Composition Goes to College • A Crafty Composition | 27th Jun 23
[…] at writing it, I am struck by how many life events have run their course since my last post. The Five Minute Mini Gift Bag was posted two years ago – when the world’s daily narrative was consumed by Covid-19. […]
bernie | 16th Apr 22
Your mini gift-bag design is really creative. Don’t think I would do it by hand on a large scale, but it give me great ideas for my shop.
thanks
Ben from https://lesthesdebernie.fr
JoElle | 11th May 22
Thank you very much. I’m glad you found it inspirational 🙂
Tania | 27th Jan 21
Aww, these are so cool!!
Tania
JoElle | 10th Feb 21
Thank you Tanya!
Lenneke | 26th Jan 21
What a great idea!❤️❤️
JoElle | 27th Jan 21
Thank you! I can’t wait to try some different themes.
Vikki | 26th Jan 21
This is such a cute idea and one that is so great for these times when a little Thank You would be nice for those who deserve it. (Teachers and others.) And what a cute “I’m thinking of you” idea too. Pinned!! 😍
JoElle | 27th Jan 21
Thank you so much Vikki. I just love the idea of leaving this on someone’s desk, counter or doorstep. . . a little thank you or pick-me-up. I think it’s even the right size for a gift card too. Thank you so much for the Pin!!