
Craft Room Makeover: Gallery Walls Part One

Last week’s post was about vignettes so it seems logical to follow with a post about picture hanging. Confused? Well, for me, a wall filled with interesting and beautiful items is just like a vignette…a vertical vignette. Gallery walls, as they are more commonly called, don’t have to be difficult to install. I know. I know. There is something so permanent and unforgiving about putting holes in your walls but with a little planning and the right tools arranging and hanging pictures can be quite easy.
Prior to my craft room makeover, I had many tall pieces of furniture and very little available wall space so I changed out a hutch for this console from World Market.

Doing this not only gave me more ‘counter’ space it freed up a large space of vertical real estate for my gallery wall.
Much like I did for my vignette, I gathered all the pictures and pieces that I could possible want on my gallery wall. I knew not everything would fit but arranging a gallery wall is a bit like putting together a puzzle and you need to have all your available pieces present.
Determine Your Wall Space
Look at the wall space you have available and consider everything around it…the furniture, plants etc. Now determine the area you want your gallery to fill (take a quick measurement). Re-create that same sized space on the floor or a large table. This is the staging area where you will ‘try-on’ the available pieces until you achieve a pleasing arrangement.
Arranging
This next step is where your personality will come into play. If you are someone who plans things down to the smallest detail you may want to take things a bit further by creating paper templates of your pieces. Here is a great tutorial for that from Southern Living magazine. I chose to wing it a little. I look at the arrangement I’ve made and pick the three largest pieces. These are my anchors from which I measure (aka ‘eyeball’) everything else. They are the first pieces I hang.
Picture Hanging 101
The best advice I can offer in reference to hanging pictures is this:
Collect your supplies ahead of time and have them within reach. This includes a hammer, a variety of nails, screws and wall anchors, a ladder, a pencil, an extra pair of hands (if possible) and definitely…
The Sola Picture Hanging Level
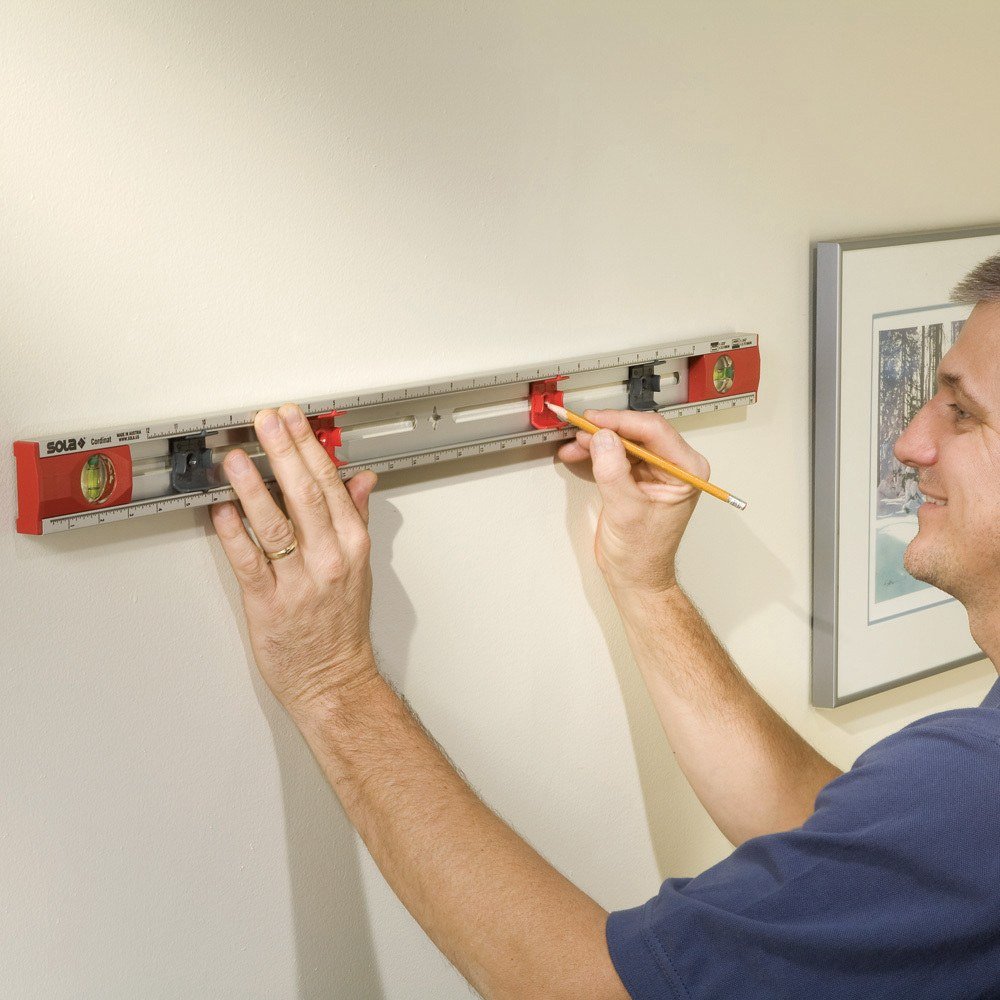
This is a game changer for picture hanging – seriously!
This level is very easy to use and will ensure your pictures are hung right the first time. Here’s the play-by-play.
First, find the center of the top of your picture frame and mark it with a piece of Delicate Frog Tape. Use a long enough piece to fold onto the back of your frame.
Next, hold your picture to the wall where you want it and make a small light mark on the wall where the top center of your frame is. Now, lay your picture face down and measure the distance between the top edge of the frame and the provided hanger. Go back to the mark on the wall, measure down this same distance and make a new small, light mark. Erase the first mark.
Now place the Sola picture hanging level on the back of your picture, lining up the zero on the ruler with the taped center of your frame. Slide the nail hole guides to match up with the provided hangers. Place the level on the wall so the center guide hole matches up with your pencil mark. Move the level up/down until the level bubble is centered. Mark where your nail holes and voila!
Where’s a stud when you need one?
One of the most challenging things about installing a gallery wall is that the studs are NEVER where you need them. Small, light-weight items are fine being held up by a nail in drywall but larger, heavier items require more support. Studs are the vertical wood beams that make up your walls and they are usually placed every 16″ or 24″. You can buy a stud finder to find out exactly where the wall studs are. The Zircon StudSensor e50 is budget friendly and gets great reviews. I always seem to want my heaviest pieces where there are no studs. I’m stubborn though and I want a picture where I want a picture so let me introduce you to my second best picture-hanging friend…

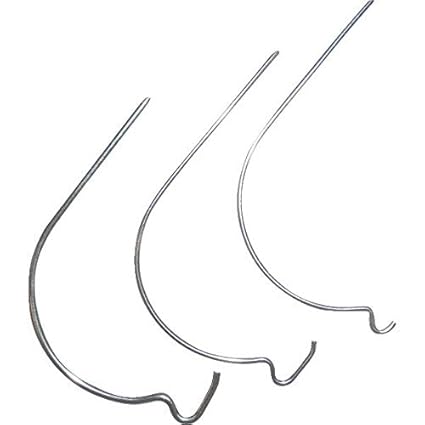
Why do I love Monkey Hooks? Well, for one, you can push them into drywall without using any tools. Yep. No hammer! Secondly, the Monkey Hook can hold up to 20 pounds and the thicker gauge Gorilla hook holds up to 50 pounds! You get both plus a flush-mount hook in the variety pack.
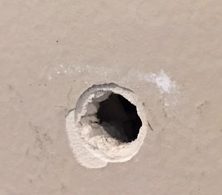
Thirdly, Monkey Hooks do all of that while only leaving a nail-sized hole in your wall instead of the crater-size hole left by wall anchors. YIKES!
Now, I know there are a few capable homeowners out there who are cringing at my aversion to wall anchors; my step-dad and husband for sure. And they are right. Sometimes, wall anchors are absolutely necessary because the fact is if you place something too heavy on a nail (not in a stud), the weight of the item will pull down on the nail and you will have a bigger dry wall disaster than any wall anchor would ever make. So be smart. If an item is large and very heavy and a stud is not where you need him it, follow this simple Drywall Anchor tutorial from house building pro, Bob Vila. Otherwise, get yourself these two awesome products and go for it.
Next Week
Craft Room Makeover: Gallery Wall Part Two
UNIQUE WAYS TO DISPLAY INTERESTING ITEMS
Related Posts

Fun & Functional DIY Lighting
I have a dilemma. A significant crafter’s dilemma that I’m sure…
November 18
4 COMMENTS
COMMENTS (I love hearing from you!)


Tania | 17th Mar 18
Great tips! I love your gallery wall too, I like that it incorporates shelves and vases, etc.
Tania
JoElle | 18th Mar 18
Thanks Tania. It might be a bit busy for many but I like having things out where I can enjoy them.
Vikki | 16th Mar 18
Great tutorial and it sounds fool-proof. Where has that Sola level been all my life? Your wall gallery looks great! Another thing I’ve found–don’t hang things too high. If most of it is somewhat at eye level, it can be enjoyed more. Thanks for all the great hints!
JoElle | 18th Mar 18
That’s a great reminder Vikki (about the height of pictures). Thanks for the comment.