
The Perfect Greeting Card
I LOVE making this card. Not only is it fun to create, it’s perfect for almost any celebration. No matter what the event is; Mother’s Day, Father’s Day, Graduation or Birthday, this card uses adjectives to remind the recipient just how truly AWESOME they are. Making the card is a little time consuming but well worth it. Why? Because this card is a keeper; reminding the receiver of all their positively valuable qualities. I mean, who can’t use a little affirmation sometimes, right?! Okay, so let’s get crafting!
Supply List
- decorative paper, one piece, (8.5″ x 11″ or 12″ x 12″)
- Coordinating cardstock, one piece (12″x12″)
- Cardstock-weight, smooth, white paper – one piece (8.5″x11″)
- Regular computer paper
- One sandwich-sized Ziploc baggie
- Confetti heart shapes or Confetti stars
- Gelato Pigment Crayons (works great for rock painting too!)
- Make-up sponges
- Embroidery floss in coordinating color + needle
- Tombow Adhesive runner
- Mini Glue Dots (optional)
- Scor-Tape (optional – It is the BEST tape adhesive. I use it on EVERYTHING)
- Craft Scissors: Best for detailed work. Best all-purpose/heavy duty
- Paper Trimmer (optional but VERY handy)
- Xyron X Create-a-Sticker (optional)
No. 1: ADJECTIVES

One of the things I love about creating and giving this card is that it requires you to really reflect on the person you are giving the card to. I like to sit down with a cup of coffee or a glass of wine in the evening and really take my time writing down all the positive adjectives I can think that relate to the recipient.

To make this card you need about sixty or seventy words so I ALWAYS pull out my Oxford Dictionary and Thesaurus. This book is so helpful because you have a definition (I find I’ve been using a word incorrectly sometimes) AND it’s synonyms all together. I know . . . all of this information is available on-line. I swear though, flipping through this book is faster and easier for me. Consequently, this book has been with me through college, professional PR writing, newsletter editing and 200+ blog posts. Best $12 investment EVER!
No. 2: TEMPLATES
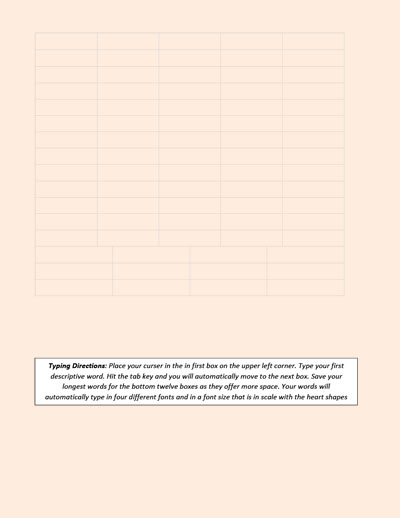
Once you’ve come up with your list of positive adjectives, download the templates. Save the PDF file to your computer and then open it in Microsoft Word. The adjective template is on page one. Oddly (when opened in Word) there is a persistent blank page next and finally the heart template is on page three.
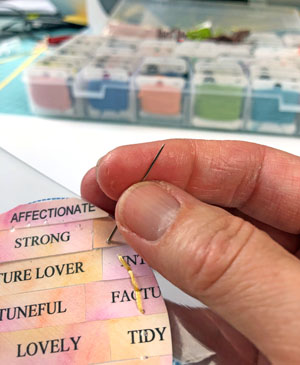
On the adjective template, place your curser in the first box on the top left. Type your first word. Use the TAB button to move from box to box. The bottom twelve boxes are for longer words. The words are set to print in a variety of four complimentary fonts and in a size that is on-scale with the heart.
After you’ve typed all your words into the template, print just page one on thick, smooth white paper. You can print the heart template on regular computer paper.
No. 3: Gelatos

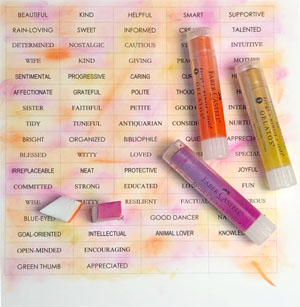
I love the way Gelatos mimic water color without the use of water. Their translucent quality and great blending ability make Gelatos the perfect choice for adding an artistic flair and color to your words. The easiest way to get this look is to rub the Gelatos crayon onto a sponge and then use a circular and/or swiping motion to rub the color onto the paper. The two examples above show my favorite color schemes.
Once you have completed coloring your sheet, use scissors or a paper trimmer to cut out the word boxes. I recommend cutting the horizontal lines first; cutting just inside the printed lines. Then make the vertical cuts according to the size of the word. Leave about 1/8″ on each side of the word when possible.
Note: it is important that each strip is the same height. The length will vary based on the length of the word.
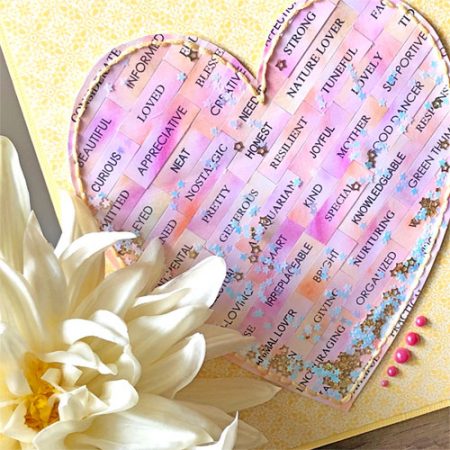
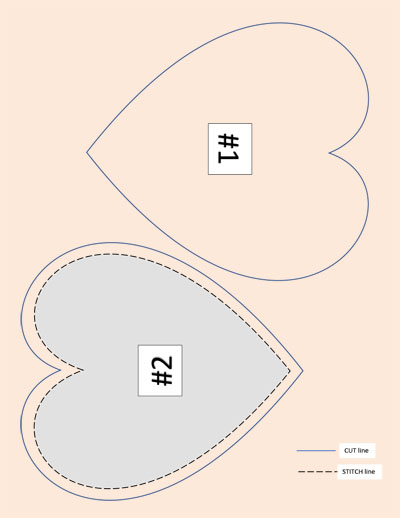
No. 4: HEART

Cut the words out. 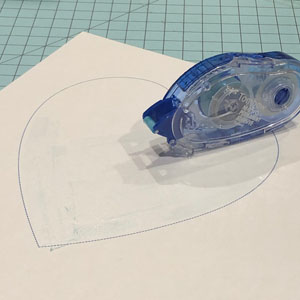
Put adhesive over entire heart #1 template. 
Stick down words. It’s okay to go over the edge a little. 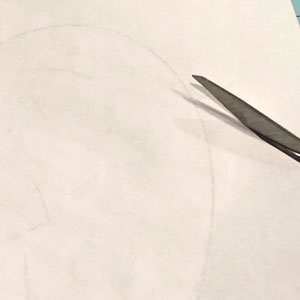
Flip the heart over to the back and cut along the line.
For this step you need the heart template #1 (don’t cut it out first!!), your adhesive roller and your pile of cut out words. Put adhesive over the heart #1 template. Go about 1/4″ to 1/2″ beyond the hearts line.
Now, put on some music and start laying down your words. I recommend placing a ruler just outside of the lower-right straight stretch of the heart. Lay your first row of words against the ruler’s edge and build up from there. It’s kind of like brick laying; a good foundation will give you a straight wall.
There’s a bit of a puzzle element to this process as you figure out if you need a short or long word – that’s why you have more words than you will use. Consequently, you’ll find you have favorite words; ones that describe the person perfectly and are important for them to know. Place those in the center of the heart. Put the lesser important words near the edges as they may get partially cut off. Try to stagger the pieces’ end/beginning lines from those on the previous row. For example, when you lay bricks or floor tile, you don’t want all your vertical grout lines to line up.
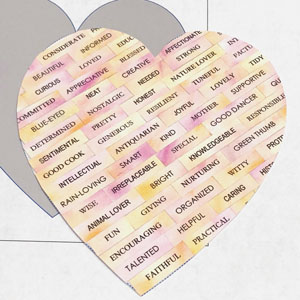
Once all your words are stuck down. Rub over them carefully with the edge of a ruler or my favorite – a pastry scraper.
Now flip the heart over so the words are facing down and cut along the line.
No. 5: CONFETTI
For this step you need heart template #2, the Ziploc sandwich bag, the needle and embroidery floss . . . and of course, the confetti.

Use glue dots to hold the heart in place 
Use a paper piercer or needle to make a hole between each dash. 
Only use 3 strands of the embroidery floss 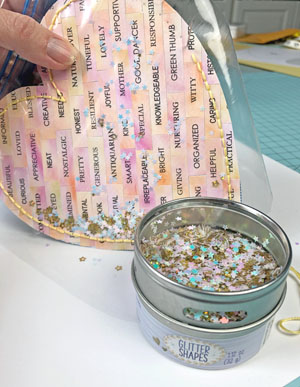
Leave an opening to add the confetti.
Put a Glue Dot on the very edge of the tip of the heart, the bottom of the “v” part of the heart and on each side of the heart (see top-left image). Carefully slide the heart into the Ziploc bag and press down on the glue dots so the heart is adhered to the plastic. To clarify, make sure you are using the NON-LOGO side of the Ziploc bag. Cut off the back of the Ziploc bag at the seam.
Next, cut out heart #2 along the solid line. Place one or two Glue Dots on the back of the template and place it on top of the Ziploc bag so the cut edge of the template lines up with the edge of the heart inside the bag. Gently press down on the Glue Dots so that you have a TEMPORARY bond. Now, use a paper piercer or needle to poke a hole through all layers (the template, Ziploc AND heart) at the space between each dash (top-right image). After you’ve poked the holes all the way around the heart, remove the template.
Sewing
Embroidery floss is usually made of 6 individual strands. Cut a 20″ piece of embroidery floss and divide the strands in half; giving you two, 20 inch pieces of 3-strand floss. Thread your needle and pick a place to start stitching (doesn’t really matter). To begin sewing, come up from the back of the heart, pulling your floss through until there is an inch of floss left in the back. Adhere that end down with tape or your adhesive runner.
Continue around the heart using a backstitch. Here’s a quick little YouTube video from KINcommunity showing the backstitch. When you run out of thread, tape the end of the first strand and the beginning of the new strand onto the back of the heart, just like you did when you started stitching. Most importantly, make sure to LEAVE A 3″ OPENING to add the confetti!
Close up the 3″ opening. 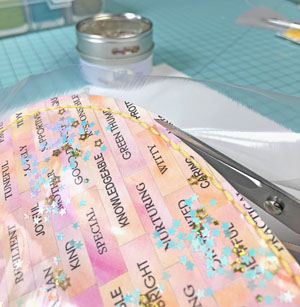
Trim the excess paper & plastic
Now all you have to do is add about a tsp or two of confetti and stitch up the 3″ opening. Lastly, trim the excess paper and plastic – about 1/4″ outside the stitch line.
No. 6: CARD
We are on the finishing stretch, I promise. With a paper trimmer or ruler and scissors, cut a 12″x12″ piece of coordinating cardstock to 12″ x 8.75″. Fold the long side in half so the card is now 8.75″ tall and 6″ wide. Now trim the 6″ down to 5 and 7/8″
Cut a piece of patterned paper to 8.5″ x 5 and 5/8″. Adhere the patterned paper (centered) onto the front of the cardstock card using either Scor-Tape or the Tombow Adhesive Runner.
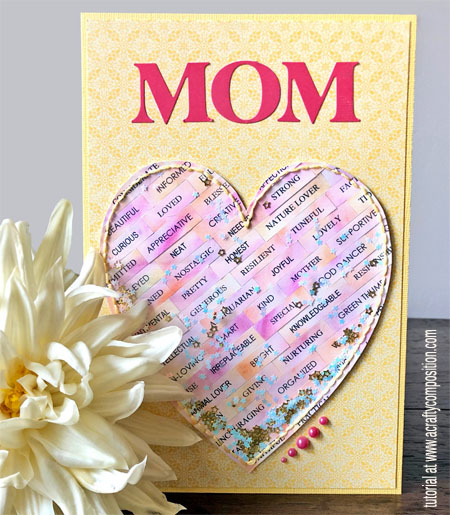
Finally, cover the BACK of the heart with Scor-Tape and adhere it to the front of the card; on the lower half so you have room for a title.
No. 7: TITLE

Run cut out letters through the Xyron X 
Rub the top thoroughly before peeling the plastic off.
For the card title you can use die cut letters, letter stickers or rub-ons. If you use your own die-cut letters, do yourself a favor and purchase a Xyron X. It turns any cut piece (up to 1.25″ wide) into a sticker. The adhesive is great and the practicality is worth the $11-$12. For Mother’s Day I chose a simple “MOM”. Other titles might be CONGRATS, DAD, CELEBRATE, YOU ROCK, YOU DID IT, UR AMAZING, GRADUATE, MARRIAGE or BABY, the age spelled out, like SIXTEEN . . . There are so many possibilities because this card is perfect for so many situations.
No. 8: EMBELLISH

The heart and the words are truly the focus on this large card so a little bit of embellishment goes a long way. Therefore, I added five little pearl stickers along the hearts bottom edge and called it complete. You can get bling, pearls and flourishes from the scrapbooking aisle at your local craft store.
Even though this card takes a bit of time, I think it is so special and perfect for many different occasions. These days the gift is often cash or a store card so it is really nice to make the greeting card something special. I did one for someone’s 80th birthday and used 80 adjectives in the heart. It was a jumbo card – but hey, 80’s a big deal!
Additionally, I think you could enlarge the templates and use it as a great art project for kids or teens – more like a poster to hang on their wall than a card. Growing up certainly has it’s challenges and it would be a fantastic exercise for kids to sit and think about all the good qualities they bring to the table.

I hope you enjoyed this tutorial. If you did, please PIN, Like, Tweet and Share all you want. Really! It’s okay – go for it!
May all you Mom’s have a wonderfully spoiled Mother’s Day. Until next time, good living and happy crafting.
Related Posts

5-Minute Mini Gift Bag
If you have followed A Crafty Composition for a while you know it is fairly…
January 26
Gum Nut Paper Garland
Have you ever seen a Eucalyptus tree blossom? It’s one of the most…
November 72 COMMENTS
COMMENTS (I love hearing from you!)


Vikki | 9th May 19
Who wouldn’t want to receive a card like this? All the work put into it shows your love for the recipient. It is certainly a Keeper! Great tutorial.
JoElle | 9th May 19
Thank you Vikki! It’s true, I love the recipient very much (wink wink)