
Trace and Transfer: A Simple Technique with Endless Applications
ARTIST n. 1 painter. 2 person who practices any of the arts. 3 professional performer, esp. a singer or dancer.
I always wanted to be an artist but I’m not. . . not in the true definition of the word. I am a crafter; a maker of stuff and things. Coming up with creative ideas is easy for me but I get stuck on the artistic execution – because no matter how hard I try, I’m not an artist. I used to get upset about this. It limited my creativity because I had a vision in my head but didn’t have the skill to accomplish the first step. Eventually, I realized it’s okay to ‘borrow’ a piece of someone’s artistic brilliance to help me down my personal creative path.* If I can use an artist’s design to kick start a cool painted rock, an applique or paper collage piece then my creativity can flow and grow rather than come to a screeching halt because I can’t draw a decent bird. This is how I learned the importance of a very simple and useful technique I call trace & transfer.
*Now, let me stop before the comment section of A Crafty Composition blows up. It is absolutely NOT OKAY to copy another artist’s work and profit from it or portray it as one’s own. AND, it’s never okay to not give credit where credit is due. I do feel it’s okay to use another artist’s work as a spring board for my own personal projects. If someone asks me if I drew something and I didn’t, I say so and then promptly share with them the book or source I took the image from. Using someone else’s art via the trace & transfer method gives me confidence to pursue projects I normally wouldn’t try. It’s allowed me to explore technique, color and different mediums rather than getting stuck on drawing an image. For those reasons, and following the rules of honesty and courtesy, I’m excited to share the trace & transfer technique with y’all.
Where Do You Find Trace-worthy Images?
The trace & transfer technique is a super simple process where by you move an image from one surface onto another. The ideal image is easily traced and not too busy. I find my images from a variety of sources such as children’s books, coloring books, internet images, stickers, scrapbook paper, wrapping paper and even a bar coaster. When you add in a printer/copier with the ability to shrink and enlarge images, you’ve got endless possibilities.
What Can You Use The Trace & Transfer Technique?
Everywhere! Not only are there an abundance of useable images; there are tons of projects to apply the technique to. The first time I learned the trace & transfer method, I was participating in a 2 hour block printing class. It hadn’t occurred to me that drawing skills were needed for this class. I was busy admiring all the cool carving tools on the table and imagining an ‘amazing’ finished product when I heard the instructor utter three panic-producing words, “just draw something”. I froze. What does one draw when they can’t draw and they are in a class that requires drawing. . . spontaneous artistic drawing? I contemplated slinking out the back door when I realized I was not the only person feeling this way.
While the artistic students were magically shooting 5 minute masterpieces out their fingertips, the instructor gathered the artistically challenged group and showed us the trace and transfer technique. Hallelujah! Not only did it save me from massive angst and embarrassment that night, the trace and transfer technique allows me to say, “Yep, I can do that” to projects I normally would give up on. Since that class, I’ve used the technique for embroidery projects, applique work, paper collage pieces, rock painting and several block printing projects
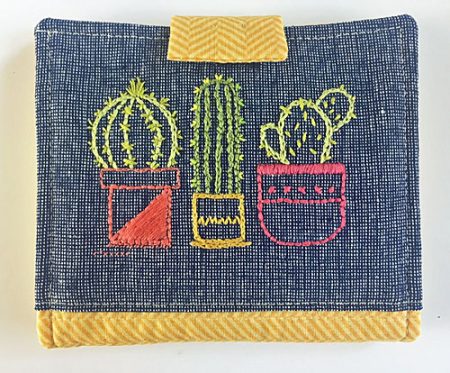
These cute little cacti are from a simple google images search. I transferred the image onto fabric and then embroidered them to create this fun little wallet.
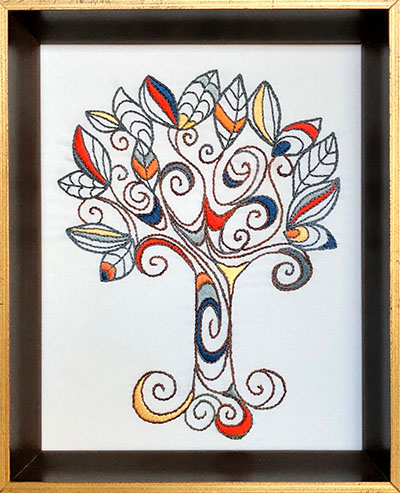
Here’s another embroidery project I completed. This unique tree was originally a piece in one of my art magazines. I enlarged the image on my printer, made a few adjustments and then traced & transferred onto muslin cloth for embroidering.
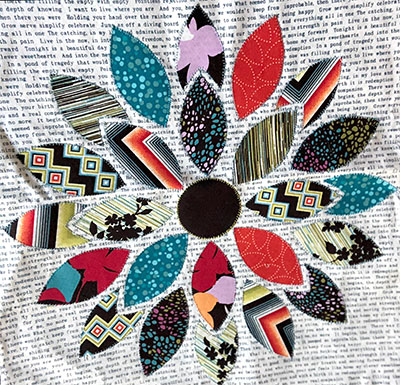
This appliqued flower began as an acrylic stamp design. I stamped the image, enlarged it on my printer and then traced and transferred the image onto various scraps of fabric.
I’m currently working with a lovely group of rock painters in Arizona to paint rocks for The Phoenix Children’s Hospital cancer treatment center. This center administers cancer treatments to children ages 3 through 18. When the kids finish their treatment, they get to pick a painted rock from a basket. The trace and transfer technique is perfect for rock painting! I can find images of some of the kids favorite characters and with a little paint and patience, help the kids’ experience be a little less yucky.

This post and the photos within it contain affiliate links. If you purchase something through the link, I may receive a commission at NO EXTRA CHARGE TO YOU. And yes, your Amazon Prime benefits still apply. Please see my full disclosure on the Nitty Gritty page.
Trace and Transfer is SUPER Easy
Do you know what makes me fall in love with a technique? When it only takes a few inexpensive supplies and it’s easy. The trace and transfer technique checks both of these boxes. There are only two supplies required that you might not have laying around the house; tracing paper and a 2B or charcoal pencil.
Tracing Paper
Pencils
When I transfer onto a light colored surface, I use a 2B pencil (this is different from a #2 pencil). When I transfer onto a dark colored surface (like a rock) I use a white charcoal pencil. A regular pencil does not work as well because you need a somewhat softer lead to transfer the image. That said, you don’t want too soft of a lead or you’ll have smudge marks everywhere. This post from the Jet Pens Blog offers a super easy description of when to use what type of pencil and what all those letters and numbers mean.
In addition to the tracing paper and special pencils, the only other supplies you need for the trace & transfer technique is a pair of scissors and a popsicle stick or mechanical pencil with no lead. . . and an image of course. Now, all you have to do is follow five easy steps!
Trace & Transfer Technique (for non-directional images)
ONE: Place your image underneath the tracing paper. Using your 2B or white charcoal pencil, trace the image onto the transfer paper.
TWO: Cut your traced image (leaving about 1/2″ around the image) away from the sheet of tracing paper.
THREE: Place your image, traced side down, onto the surface you are transferring onto
FOUR: Rub the back of the image with a popsicle stick or the end of a mechanical pencil with the lead removed or retracted
FIVE: Go over your pencil lines with a Sharpie or if on fabric, a Pilot Frixion Pen (the pen marks disappear when ironed)
Trace & Transfer Technique for Directional Images (letters & numbers)
ONE: Place your image underneath the tracing paper and tracing using a dark Sharpie
TWO: Cut your traced image (leaving about 1/2″ around the image) away from the sheet of tracing paper.
THREE: Flip your traced image over. Using your 2b or white charcoal pencil, trace the Sharpie lines
FOUR: Place the PENCIL side of your traced image down onto the surface you are transferring onto
FIVE: Rub the Sharpie side of the image with a popsicle stick or the end of a mechanical pencil with the lead removed or retracted.
SIX: Go over your pencil lines with a Sharpie or, if on fabric, a Pilot Frixion Pen (the pen marks disappear when ironed)
Want to see these steps in action? Click HERE to check out my short video showing the Trace & Transfer process on the Crafty Composition YouTube Channel.
Thanks so much for hanging out with me for a bit today. I hope you find this technique useful for your next craft project. If you have any questions or comments – check out the comment section below. I love hearing from you! ALSO, If you haven’t already done so, SUBSCRIBE (the button is on the top-right of the blog). Subscribers get an email once a week with links to the latest posts AND the super secret password to the Subscriber Freebie page full of FREE printables, recipes, tutorials and more. Have a wonderful weekend and as always,

Related Posts

5-Minute Mini Gift Bag
If you have followed A Crafty Composition for a while you know it is fairly…
January 26
Gum Nut Paper Garland
Have you ever seen a Eucalyptus tree blossom? It’s one of the most…
November 72 COMMENTS
COMMENTS (I love hearing from you!)


Lenneke | 6th Oct 18
Thanks! Now I can start painting!
JoElle | 9th Oct 18
You bet! Can’t wait to see your rockin’ rocks!!