
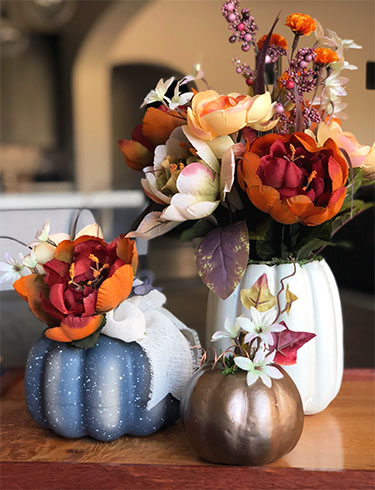
Splendidly Easy Fall Centerpiece
Happy Fall!
Fall is one of my favorite times of the year because no matter where you are, it’s beautiful. The sunlight is a little softer. The colors are a little crisper, and in general everyone seems a bit more joyful. The Arizona desert certainly doesn’t transition into October with a confetti of color though. Consequently, we have to fake fall a little so I’ve always got my eye’s open for seasonal décor projects that promote that cozy autumn feel. When I saw these charming faux petite pumpkins at Target this week, I knew they were the perfect start to an easy fall centerpiece.
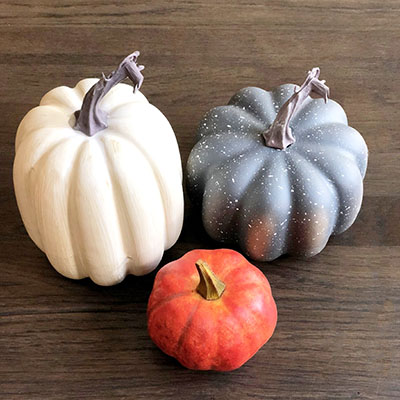
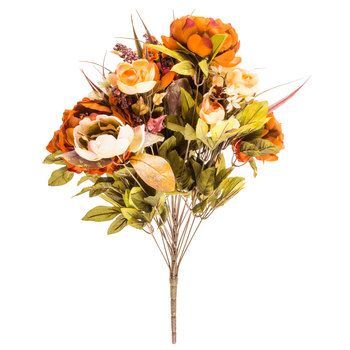
The medium pumpkin is only $3 and the larger one $5. The smallest pumpkin came from one of those craft store bags of mini pumpkins – something I already had at home. In fact, most of the additional items needed to create my centerpiece were items I already had in my fall décor stash. I did need a good faux fall foliage bush though (bet you can’t say that 10x fast). I found mine at Hobby Lobby for about $15 (with 40% sale). It’s very full and lush; I only used about half of it for the centerpiece.
Additionally, I used some wide ribbon, copper wiring, dried floral moss and a little bit of bronze spray paint. I also heated up my glue gun and made sure to have scissors, wire cutters, and a knife handy.
The Large Pumpkin
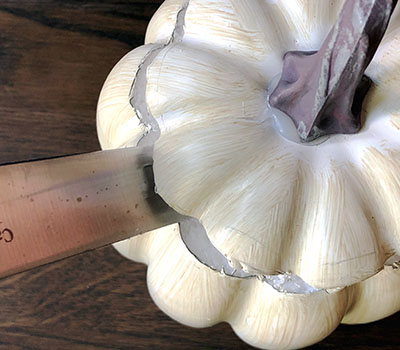
Creating a centerpiece is just like making a vignette (Creating Beautiful Home Decor Vignettes) so I always start with my biggest piece first. The large pumpkin has a foam core inside so I cut off the top of the pumpkin to access the foam. Using a string and a pencil is the easiest way to ensure an even circle around the top of a pumpkin. Once you mark your circle, use a sharp, long knife; at an angle.

The white foam inside the pumpkin is very stark. You don’t see much of it after the foliage is added but I think it looks nicer with a more natural product. I used dried floral moss.
Cut the moss larger than the foam opening so the sides and top have coverage. Stick it down with a bit of hot glue and trim the edges.

Using a pair of wire cutters, cut the branches from the faux floral bush. Now all you have to do is push the branches through the moss and foam to create a pleasing arrangement. If you are using this for a table, make sure to look at the arrangement from all sides and angles. Additionally, don’t make it too high so people can still see over it when socializing.

And there you have it. With just a few supplies and 15 minutes, the largest pumpkin is done.

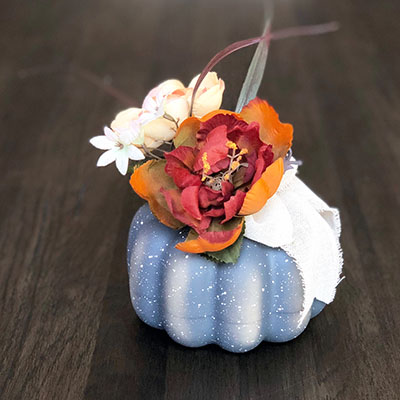
The Small Pumpkin
Now that the main focal point of the centerpiece is done, we can move on to the middle sized pumpkin. This pumpkin is an unusual color; a bluish gray, and it has some fun paint splatters on it. I don’t want to cover it up too much or make it too big so I’m just adding a few floral accents and a bow. You don’t need to cut the top off of this pumpkin as you can just poke the few branches under the pumpkin’s stem.

To make the bow, I used about one foot of a 2.5″ wide woven ribbon. I know there are several bow making tools out there but I don’t have one and my bow making skills are not great so here’s what I like to call . . . the cheaters method. If you have a better way of making a bow, go for it (and share in the comment section).
Cut a 6″- 7″ piece of the ribbon and fold both ends back so you have a circle with the two ends overlapping each other.

Cut off a piece of bendable craft wire (4″ or so) and fold it in half but don’t crease it. Hold the folded ribbon, top side up, in one hand and slide it between the two ends of the craft wire. Bring the wire together at the back of the bow and twist 2-3 times as tightly as possible without breaking the wire.


For the ribbon tails, I simply fold the remaining 5″- 6″ of ribbon in half and pull the ends opposite each other to form a ‘V’. Place the folded part of the ‘V’ against the back of the bow you made, poking the wire through the middle of it. Now give the wire a few more twists to hold everything in place, fluff the bow, clip the tails and slip the wire into the pumpkin at the stem. You may need to trim your wire down to 1/2″ to 1″ to push into the pumpkin – so the wire doesn’t bend.
Before you know it, you’ve got two of the three pumpkins done.
The Littlest Pumpkin
It makes sense that the smaller the pumpkin, the less decorating it needs. We don’t want to over power it. This last little pumpkin only needs a some bronze spray paint, a little foliage and copper wire curls to look absolutely charming. To make the copper wire curls, simply wrap a 4″ – 5″ piece of copper wire around a pen, slide it off and stretch it out a bit. Poke the non-curly end of the wire into the stem section of the pumpkin.

Putting It All Together
Finally, just find a pretty tray or plate charger to arrange your pumpkins on. I added a fall scented candle and a simple quote held by one of the cool wine cork place markers we made last fall (instructions HERE ).
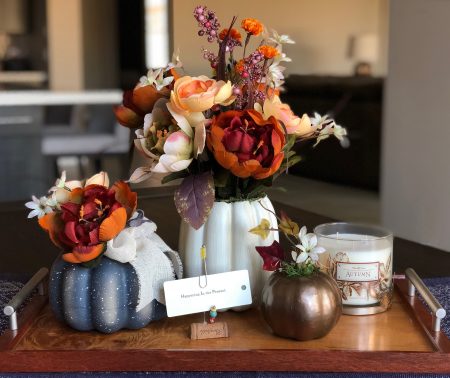
The wonderful thing about this centerpiece is that you can make it as compact or large as you need. Create a long meandering centerpiece by adding more pumpkins (odd numbers), candles and a leaf garland woven through it all. It’s quick, easy and beautiful.
Thank you very much for your positive response to the new super subscriber page. Adding this page has doubled my subscribers this week – something I have worked over a year to try to accomplish. I so appreciate the support and I hope y’all find the material available on this page worth the few minutes it took to subscribe. It’s FREE, fairly PAINLESS and shows you value the content I am creating. Speaking of which, I am adding a new FALL COCKTAIL RECIPE to the Subscriber FREEBIE page later this week. You won’t want to miss this delicious alternative to the Moscow Mule.
Have a fantastic weekend and as always,

Related Posts

5-Minute Mini Gift Bag
If you have followed A Crafty Composition for a while you know it is fairly…
January 26

COMMENTS (I love hearing from you!)