
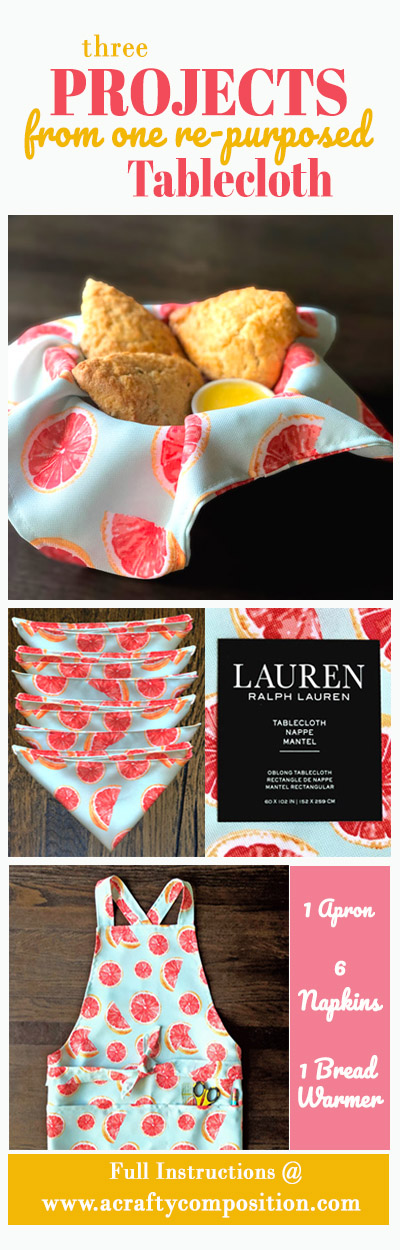
Three Projects From One Tablecloth
By now I think you know that I love two-fers. Like the Green Chili Casserole that not only gives you two nights of dinners but also bonus breakfast muffins . . . and these beautiful Paint Poured Pots that also give you gorgeous art rocks. I do a little happy dance in my heart when one item or bit of effort brings forth a bounty of goodies. Life’s short and I want to make A LOT of stuff so yes, I’m all about saving money and time. Given the sheer glee I feel from a two-fer deal, you can imagine how ecstatic I was to make EIGHT items out of ONE $17 tablecloth! I’m surprised you didn’t hear me! Eight for one! Holy dooley!
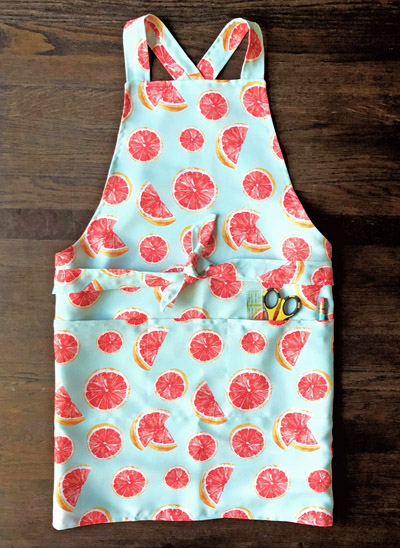
One CUSTOM-SIZED Apron
Jump to ACT I: The Apron
One Bread Basket Warmer
Jump to ACT II: The Bread Basket Warmer
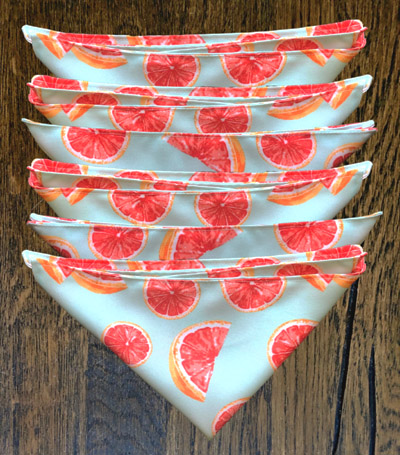
and Six Dinner Napkins
and, Jump to ACT III: Dinner Napkins

ACT I: The Apron
So some of you may be wondering, why did I look at a tablecloth and say, “I need to make an apron out of that!”
It was literally my first thought when I saw the tablecloth. Why? Because of the material. You see, My intent was to create an apron that would protect my clothing while doing arts and crafts – because my style of arts and crafts is not . . . tidy. When I’m in the ‘creation zone’, I do NOT consider surface protection. I’m in the trance of creation. I could have a crafting epiphany while wearing my Sunday best and . . . I gotta do it. Right then. So – I wanted to make an apron that could protect my clothes.
Now – fair warning. This could go horribly wrong. I chose the indoor/outdoor tablecloth because it is “liquid resistant”. Therefore, I have full confidence that the fabric will protect my clothing. BUT – what remains to be seen is if I will be standing in a puddle of glitter, glue and acrylic paint; as all my crafting mess slides down my “liquid proof” apron and right onto the floor. That remains to be seen. But nevertheless, the first thing I need to address is how to cut one apron, 6 napkins and one bread warmer from a single tablecloth. So, here we go…
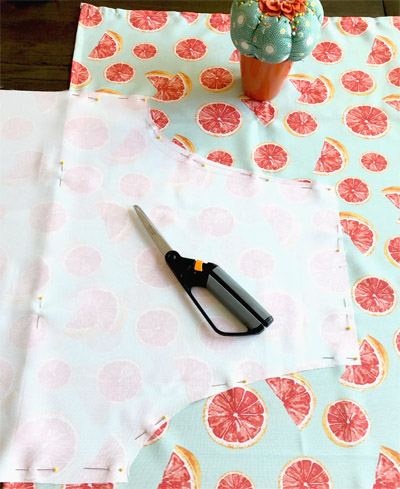
How to Cut 1 Apron, 6 Napkins and 1 Bread Warmer From a Tablecloth
First, one very important bit of information about the tablecloth you buy – it should NOT have a flannel back. You know, the vinyl ones with the fuzzy white stuff on the backside? DON’T get one of those! Look for a polyester blend tablecloth that says “water-repellent” or “indoor/outdoor” in it’s description. I bought mine at Home Goods but this gorgeous botanical/floral one would be perfect. How about this tablecloth – so bright and cheerful or you could go for an absolute tropical dream. A simple Delft Blue tablecloth always offers a crisp look and this one’s scale is good for the projects. There are several good choices out there. To get all eight items you need a tablecloth that is rectangular (oblong) and a minimum of 60″x 102″.
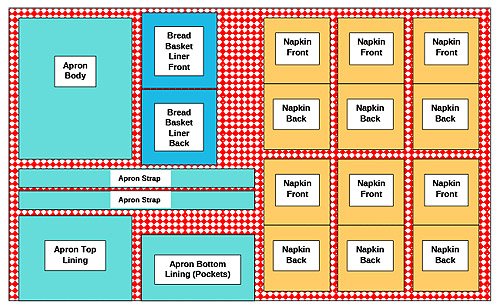
A couple notes on cutting out your pieces…
- Make paper patterns from butcher or wrapping paper to save A LOT of time measuring. Just pin, mark, cut, repeat.
- Notice the Apron Top Lining and Apron Bottom Lining are placed on the edge of the tablecloth. This takes advantage of the tablecloth’s original hem – a little less work.
- Want a wider/longer apron? The diagram, as is, allows for about three extra inches of width. Run the apron straps vertically between the bread basket and napkins to get up to eight more inches in length.
- Remember, if you make the apron wider – the liners have to be wider. If you make the apron longer, just add the extra inches to the bottom/pocket liner only.
- The tablecloth material frays easily. The sooner you sew your cut out pieces the better.
A Quick Break To Meet DICKBlick
Before I go into the nitty gritty of how to make this apron I want to introduce one of my new affiliate merchants, Dick Blick. If you are fortunate enough to have a Dick Blick store in your area, I strongly encourage you to go visit. You will feel so inspired. It is nothing short of amazing. There are supplies for every kind of art/craft you can imagine. The staff is always VERY knowledgeable AND they often offer classes or seminars on various amazing topics. If you don’t have a local store – or if you are in a pajama crafting marathon. Here’s a coupon that will help you out. (Just click on the text below.)

How to Measure for a PERFECT-fitting Apron
A good apron is priceless! I wear one not only for cooking but also for crafting . . . and of course, every time I Arted. The manufacturers say, “one size fits all“. Hmmm. I’m 5′ 1” and just recently graduated from the teen bra section (thanks menopause). I have friends that are 5’7″+ and curvalicious. Hello! We do NOT fit in the same apron.
What’s the solution? Make your own custom-sized apron from a tablecloth of course! And guess what? I have a easy formula and design to help you do just that.
STEP No. 1: Put on your bra. Yep, I know! I’m sorry if the girls are free and lovin’ it right now – you have to put on your bra. Now locate the spot on your chest where your bra strap meets the actual bra . Measure from the outside of the left strap to the outside of the right strap. Make sure you are measuring North of the hills and valleys (aka – chest not boobs). Write your number down. This is your “C”
STEP No. 2: Measure from the same point on your bra down to whatever length you want your finished apron to be. Add one inch to that number and write it down. This is your “L”
STEP No. 3: Finally, multiply your “C” number (Step 1) by 2.5. This is your “W” so, you guessed it, write it down
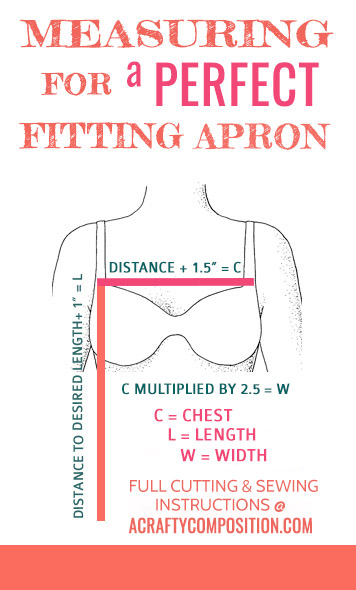
Plugging the Numbers In
Just plug the numbers for L (length), C (chest) and W (bottom width) in the appropriate spots below and you have the dimensions for a one-of-a-kind, perfectly-fitted-to-you apron. As I’m going through the instructions below, I will give you an example using my numbers for C, L and W
example: The distance between my two bra straps is 8.5″. Add 1.5″ to that number so “C” = 10″. I’m not picky about the length so my “L” = 28″-30″. Lastly, my C number is (10″) and I multiply it by 2.5 which gives me my “W” = 25“. W represents the width of the apron at the bottom.
Supplies:
This apron design has straps that criss-cross in the back and then tie at your waste (in the back). To make the loops for the apron straps to run through, you need 12″ of 5/8″ wide decorative elastic or ribbon. That’s it – that, your tablecloth, some thread and the promise from all living creatures in your household to leave you alone for two hours.
Let’s get started . . .
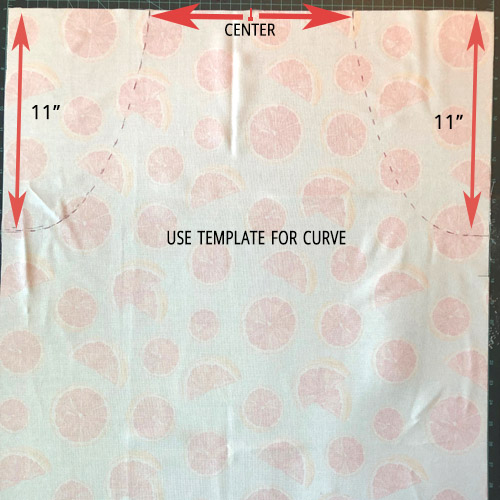
From the tablecloth, A) cut a rectangle that is C” x W”. B) Chose which end is the top of the apron and mark the center of it. Now, divide your C measurement in half (My C is 10″ so half is 5″). Measure and mark that distance (5″) from the left and right of the center mark you made. C) Measure and mark 11″ down from the top left of your fabric. Do the same on the right. D) Finally, print out the arm curve template and follow the instructions on the template (basically; cut out template, lay on fabric, use pencil to mark cut line) E) Cut out the arm holes you traced (the dotted line in the image below). Now you have your full apron side 1 cut out.
Let’s take a little intermission to talk linings – shall we?
Oh lining how I love thee. . . let me count the ways. ONE: you hide the ugly frayed edges and make my stuff look nice on both sides. TWO: you actually save time by making me sew around my project only twice rather than thrice. With a lining, I sew around once to put the pieces together and then again for the top stitch. Without a lining I have to go around once for the first turn under, again for the second turn under to get rid of the frayed edge and finally a top stitch. THREE: and this is the very best reason to use a lining – easy and plentiful pockets!! You gotta’ love an apron with pockets!
So don’t fight it – embrace the linings. Love the linings. Be at peace with the linings and all will be sewn well.
Measuring and Cutting the Apron Linings
So, you’ve bought off on my theory of lining wonderfulness – here’s how to measure and cut them out. The linings are split because we want pockets.
Before we start cutting, scroll back up to the cutting plan diagram. See how we take advantage of the existing tablecloth hem for the two lining pieces? Okay keeping that in mind, find that nice finished hem on your tablecloth.
Top Lining
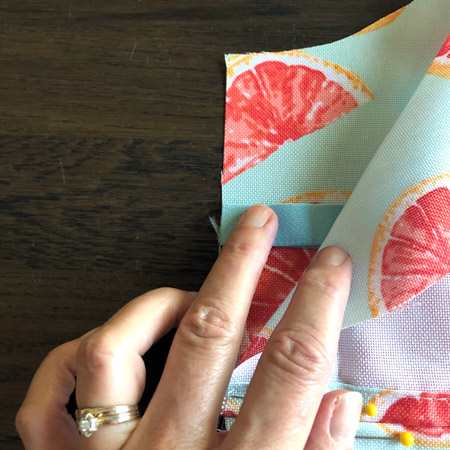
F) Measure up 17″ from the hems edge and make a pencil mark. Go six or seven inches across the hem, measure up 17″ and make another mark. Do this four times. It’s always gonna be 17″; tall, short or curvy = always 17″. G)Now, align a long ruler or yardstick across the dots and draw a light pencil line.
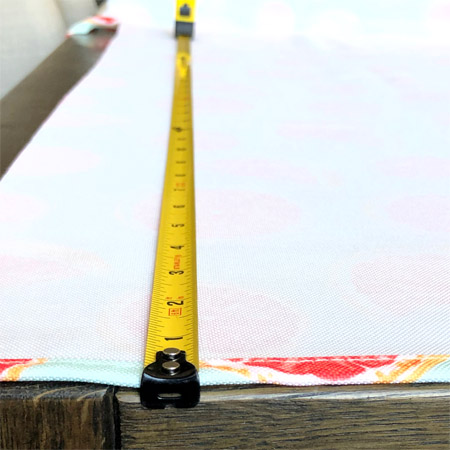
H) Lay your fully cut apron pattern piece on top of the tablecloth. Line up the top the apron piece to the 17″ pencil line you drew. Pin the two pieces together (see image below). Measuring is important on this step so take your time. Trace along the apron piece lightly with a pencil. Unpin and cut out.
Bottom Lining
The second or bottom lining piece is quite simple. I) First, take your “L” number (mine was 30″), subtract 17″ (=13″) and add 1.5″ (=14.5″). Let’s call that new number B and that is the number (14.5″ in my example) you will measure up from the hem. Do the same thing you did with the 17″ BUT instead, use your B number. Your bottom lining needs to measure W x B. In my example that would be 25″ (W) of hem x 14.5″ (B) of height.
Straps
FINALLY, J) cut two long strips for the straps. They each need to be 4″ wide by a minimum of 48″ long. If you’re worried about them being too short, sacrifice one of your napkins and make your straps 60″ long. To simplify things, you may use 1.75″-2″ wide coordinating grosgrain ribbon for your straps
WHEW! Pat yourself on the back. Do a little dance. Sing a little song. All your apron pieces are cut out!
Putting the Apron Together
Okay. Now it’s time to put this entire apron together and, believe me, the majority of the work is already done. The most important thing is to get all the layers in the correct order.
Layers
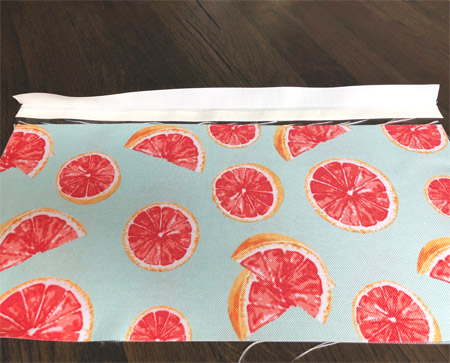
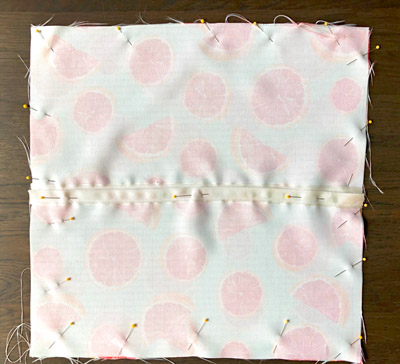
K) Lay your full cut apron down with the patterned side up. L) Place your apron straps on top of the full apron piece, 1/2 ” in from the right and left corners. M) Lay your bottom lining over the bottom half of the full apron piece, patterned side down. Match up the bottom and side edges and pin. Add 3 or 4 pins across the top of the bottom layer (where it goes across the middle of the apron. N) Cut the 12″ piece of decorative elastic/ribbon into two 5″ strips. O) Loop them in half and attach them to the side of the apron, about 1″ down from corner, loop facing INWARD. See image below. Pin.
P) Now, lay the top lining over the top part of the full cut apron, patterned side down. Match up all your edges. This piece will overlap the bottom lining by about an inch. Pin to secure, including the section that runs across the middle of the apron.
Sewing The Apron
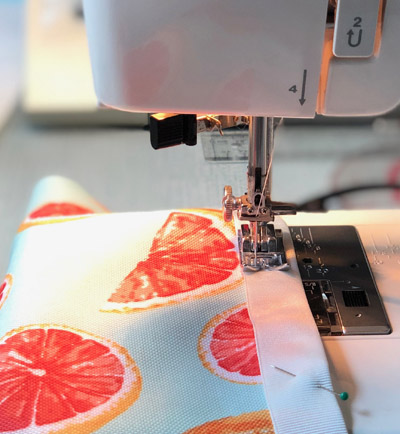
Now that you have everything pinned – patterned sides facing each other, you are ready to sew. Q) Use a 3/8″ stitch and sew around the entire PERIMETER of the apron – NOT where the two lining pieces overlap in the middle of the apron.
Now this is where you get to see the magic of your work!! R) Turn the entire apron right side out via the opening between the linings in the middle of the apron. MARVEL AT YOUR SUCCESS FOR A MOMENT. S) Press with your iron and pin for top stitching. T) Sew a 1/4″ top stitch around the parimeter of the apron.
Pockets
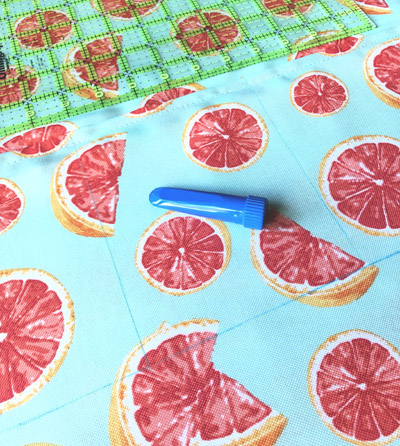
You’ve done such a fantastic job! all you have remaining is the bottom pockets and this is VERY easy. First, U) decide how deep you want your pockets. I chose 6″ because my iPhone and an average pen/pencil is a little less than 6″ tall. This also happens to be the width of my favorite quilting ruler so it makes it very easy to grid out. Next, decide the different pocket widths. V) Mark it with tailors chalk. Pin it so the material doesn’t slide while you sew. W) Top stitch over your chalk markings. Yep, right on the good side of the apron.
A little side note about quilting rulers. I use them for EVERYTHING! It doesn’t have to be related to quilting. Anytime you want a true, square measurement , use a quilting ruler. They are not that expensive and I promise, you will use them over and over again.
YOU DID IT!
I know it was a lot of steps – “W” steps as a matter of fact. But I’m so proud of you! So far, I LOVE my new apron. My favorite thing about it is that it doesn’t tie around my neck – which I really hate. This apron criss-crosses on my back and ties at my waste so I don’t feel pulling on my neck. I will let you know; however, if I end up standing in a puddle of paint. . .
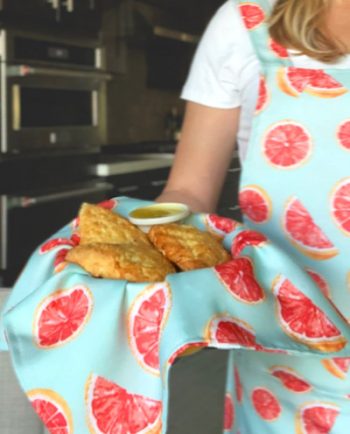
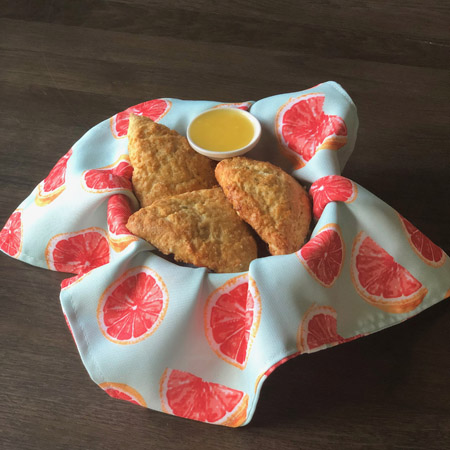
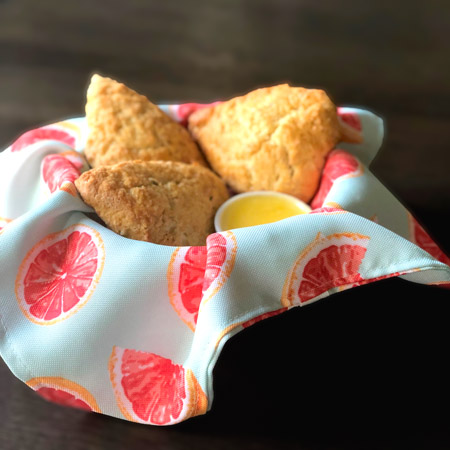
ACT TWO: The Bread Basket Warmer
This is one of my favorite projects! It is quick, simple, useful and makes a fantastic gift. Who doesn’t like a basket-full of warm buns?!
Supplies
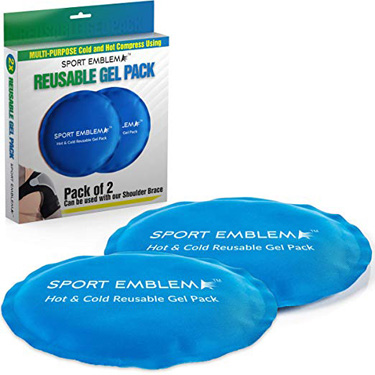
In addition to the tablecloth fabric you need one yard of 1.5″ wide grosgrain ribbon (the ribbon with ridges) and 1/2″ Steam-A-Seam double sided tape. Oddly, you also need these heat packs. When heated up in the microwave and slipped into your bread warmer they keep those delicious baked goods warm and fresh. Trust me. It works like a charm!
Cutting & Sewing
A) Start with two 16″ squares of fabric. Of course, you can make the squares larger for bigger baskets but I recommend keeping them between 16″ and 20″. B) Cut one of the squares in half, giving you a total of three pieces, one 16″ square and the two 8″x16″ pieces.
C) Cut two 16″ pieces of grosgrain ribbon and two 16″ pieces of Steam-A-Seam. D) Lay the sticky side of the Steam-A-Seam down along the bottom edge of the ribbon and iron to adhere. DON’T pull the top paper off the tape until step E. Fold the ribbon in half width-wise and press (see image above). E) NOW, peel the top paper from the tape. Align the long raw edge of one of the 8″x 16″ pieces of fabric onto the Steam-A Seam tape with the pattern side facing up. The edge of the fabric will come to the top of the tape but not all the way to the ribbon crease. F) Fold the ribbon at the crease and press to adhere. G) Pin to hold in place. Repeat steps D-G with the second 8″x16″ piece of fabric. H) Top stitch 1/4″ in from edge of ribbon.
Now it’s time to attach the three pieces of fabric together. I) Lay your full square down, pattern side up. Next, lay the square halves (with ribbon) on top of the full square, pattern side down. Your ribbons should overlap in the middle of the square. Pin.
J) Finally, sew all around the square with 3/8″ stitch. K) Turn right-side out, press and sew a 1/4″ top stitch.
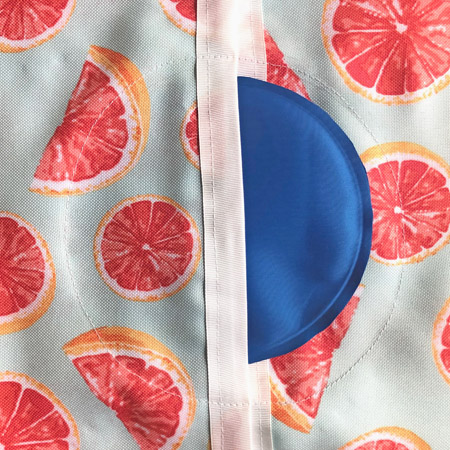
Making the Heat Pack Pocket
The last step is to make the pocket for the heat pack. L) Lay the bread warmer down so that the ribbons are facing up. Slide the heat pack in and center it. Put 4-5 pins in to the left and right of the heat pack to make sure your material doesn’t shift around. M) Find a bowl that has a 6″-7″ opening and set it upside-down over the bread warmer/heat pack. Trace lightly with a pencil. N) Sew on the traced line (see image above). Now you have a perfect pocket for the heat pack and a nice base to sit into your bread basket.
These bread warmers, paired with an inexpensive basket and some yummy baked goods, make wonderful gifts. What a special way to thank a friend or teacher. New neighbors? Greet them with a warm basket of muffins or scones and they get to keep the whole kaboodle. Put in some fresh cornbread or biscuits and a can of chicken noodle soup and you have a perfect “fell better soon” gift.
Make 8 Items from One Tablecloth ~ A Crafty Composition Blog
Introducing A New Merchant & A Delicious Lemon Scone Recipe

I discovered Savory Spice Shop a few weeks ago when I received a thoughtful gift bag from family living in Colorado Springs. It included a fragrant culinary lavender (used in the scones), Black Truffle Sea Salt (a-m-a-z-i-n-g), Pike’s Peak Butcher’s Rub (summer grilling!) and Vietnamese Sweet Lemon Curry, which I haven’t used yet.
I was so impressed by the quality, packaging and resources Savory Spice Shop offers, I contacted them about becoming an affiliate. I’m thrilled to say they accepted so please welcome SAVORY SPICE SHOP!
Savory has a wonderful website with easy ordering, lots of recipes (like these amazing lavender lemon scones) and even their own blog! Use the coupons below to get FREE SHIPPING or SAVE $$ – a perfect way to give Savory Spice Shop a try.

I highly recommend this Lavender Vanilla Bean Sugar – a perfect topping for the Lemon Lavender Scones.


ACT III: Super Simple Dinner Napkins
I definitely saved the easiest (and some would argue the most boring) project for last. I’ll be honest here – I was afraid you wouldn’t make it to the apron and bread warmer, which are clearly more exciting, if I had put the napkins first. Yes, I confess. It was strategic. However, if you made it this far, don’t feel played – feel honored that you have a longer than average attention span.
So, let’s jump right in. Making dinner napkins from a tablecloth (or any fabric) is so easy using this quick double-sided method. Tablecloths are a perfect choice of fabric because 1) they’re typically already treated for stain resistance 2) you can coordinate ALL your table linens and 3) They are fairly inexpensive. For some great tablecloth choices, scroll back up to How to Cut 1 Apron, 6 Napkins and 1 Bread Warmer From a Tablecloth
Just SIX Steps
A)Each napkin is made from two 15″ squares. B)Simply lay one square on top of the other with the pattern sides together and pin. C)Sew around the edges (1/4″), leaving a two inch opening on one side. D)Next, turn the napkin right side out by pulling it through the two inch opening. E) Iron flat, tucking in the raw edge of the two inch opening to match. F) Lastly, sew a 1/4″ top stitch.
Voila! You have made a double-sided dinner napkin.
I know this method takes twice the fabric but I love how, no matter which way the napkin is folded, it looks finished and pretty.
Speaking of Pretty . . .
I’m thrilled to introduce this new merchant affiliate to you because everything they offer is pretty. Décor Steals offers true farmhouse style décor through daily deals. Three new products are offered at 10am (EST) EVERYDAY – and they go fast! BIG BONUS – everything ships for a flat $5 each – no matter the size or weight!

Click on the box above or HERE to check out the Décor Steals shop. Make sure to sign up for emails to get first notice on Flash Deals and Pop Up Shops. Additionally, their blog, DécorInsider, is a must for wonderful farmhouse style inspiration.
Well lovelies. I hope you enjoyed this three act post: Three Projects from One Tablecloth. I’m curious to hear if you enjoyed getting the post in bits or if you prefer the whole nine yards at once??? Let me know in the comment section below.
DID YOU KNOW: Pinterest is one of the best ways to share A Crafty Composition with other creatives. If you have a Pinterest account, simply hover over any pictures on the blog until you see the red Pinterest “P SAVE” icon. Click & Pin. Pinterest is my go-to spot for inspiration and it’s a great way to save something you want to make at a later date. LOVE IT!
Don’t forget to check out these THREE new and, might I say. . . fabulous affiliate merchants. I’m working hard to find more quality shops and great deals for my readers. Thanks for hanging out with me at A Crafty Composition and until next time, Happy Living – Happy Crafting.


Related Posts

5-Minute Mini Gift Bag
If you have followed A Crafty Composition for a while you know it is fairly…
January 26
Gum Nut Paper Garland
Have you ever seen a Eucalyptus tree blossom? It’s one of the most…
November 715 COMMENTS
COMMENTS (I love hearing from you!)


Maria Conti | 9th Jul 19
Thank you for all all your hard work! Great projects🥰
JoElle | 11th Jul 19
Thank you Maria. I love doing it so it makes me so happy to know you appreciate it.
Laura Williams Allen | 8th Jul 19
Excellent! Great job!
JoElle | 11th Jul 19
Thanks so much Laura!
Vikki | 8th Jul 19
I like all three projects, but I think I like the apron the best. This was a great idea—do it again sometime.
Vikki | 2nd Jul 19
Good job on instructions. I love this apron. Looking forward to the next segment. (Absolutely LOVE the cat video!!!)
JoElle | 5th Jul 19
Thank you Vikki. I really like the bright and cheerful ‘fabric’. I agree, cats are so darn amusing. Thanks for your comment. Hugs.
Maria Conti | 2nd Jul 19
Great Idea and instructions! Thank you! Happy and safe 4th of July to you too!
JoElle | 2nd Jul 19
Thank you Maria and Happy 4th to you too.
Dana D. Davis | 30th Jun 19
Sounds great JoElle.
JoElle | 1st Jul 19
Thanks for following along Dana!
Tania | 29th Jun 19
I love this idea JoElle! Looking forward to each episode of this new sitcom!!
Tania
JoElle | 1st Jul 19
Thank you Tania. Here’s hoping it goes well.
Vikki | 29th Jun 19
I like your idea and I’ll be there. That is very cute fabric and I love your apron. 5 Stars!
JoElle | 1st Jul 19
Thanks so much Vikki. I look forward to Tuesday. Fingers crossed I can figure it all out.